![]() |
| Malayalam Keyboard for PC |
Month: April 2016
-

Malayalam Keyboard For PC ; Windows, Linux and Mac
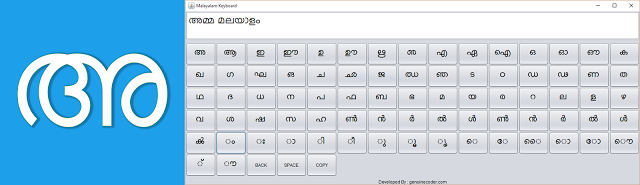
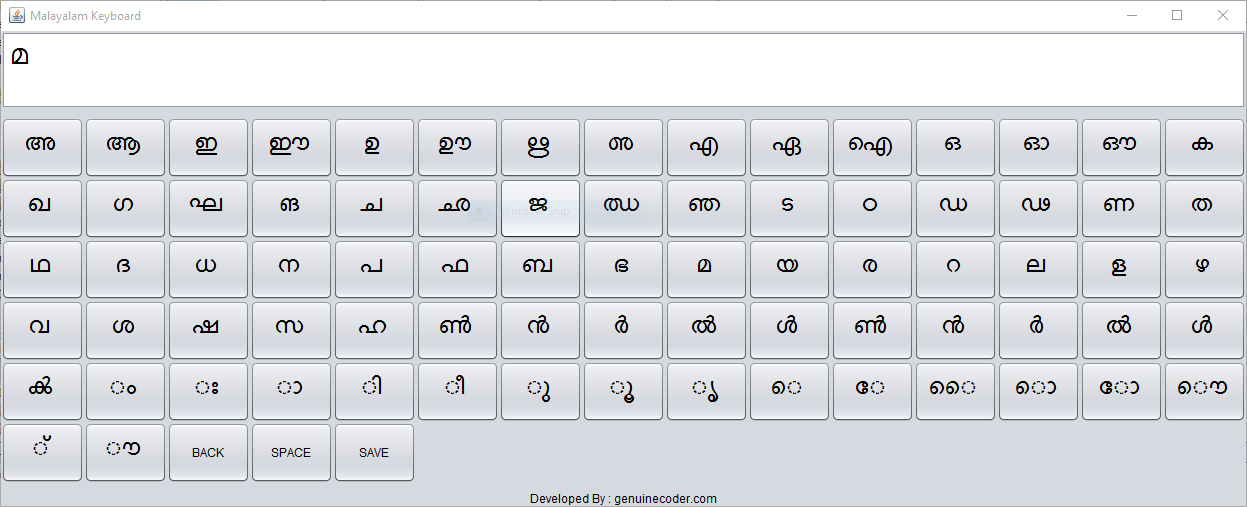
Malayalam keyboard for PC / Desktop is an On-screen Malayalam keyboard that built using java programming language and will work on Windows, Linux and Mac operating systems.
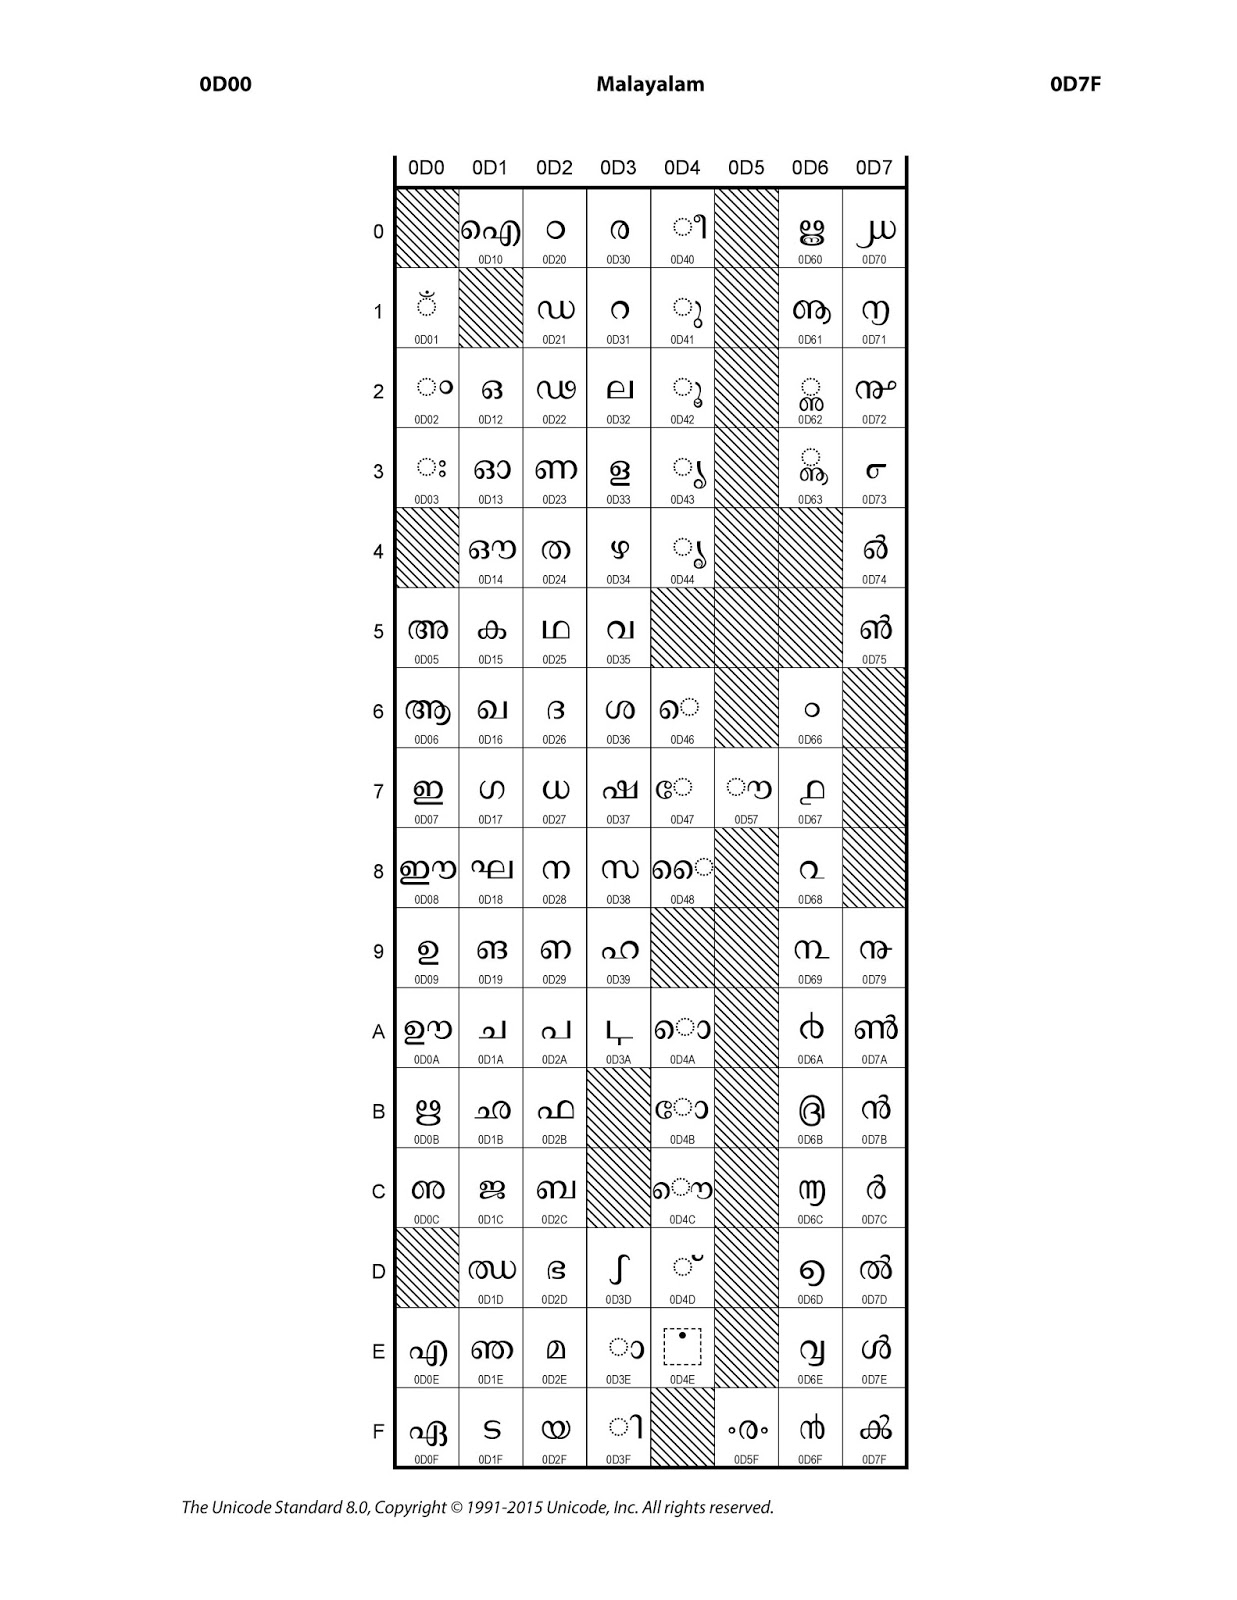
In the Unicode character representation Malayalam characters are available in between 0D00–0D7F hexadecimal values. In this software you can find all the Malayalam characters as buttons in the application. Clicking on the button will display corresponding character on the screen.Normally the Malayalam characters like ‘മ്മ’ is written using മ + ് + മ and ‘ക്ക‘’using ക + ് + ക. Ii this application, I have added a shortcut to this via Mouse Right Click. For example, the normal left click on the മ will give മ itself and right click on the മ will give മ്മ. This is applicable for all characters.The ‘BACK’ button will give the normal backspace effect and ‘SPACE’ will do the normal space. ‘SAVE’ can be used to copy the contents in textbox to memory/clipboard which then can be pasted to other applications.Malayalam Unicode tableSource Code:-package malayalamkeyboard;import java.awt.AWTException;import java.awt.Button;import java.awt.Font;import java.awt.FontFormatException;import java.awt.GraphicsEnvironment;import java.awt.Robot;import java.awt.Toolkit;import java.awt.datatransfer.Clipboard;import java.awt.datatransfer.StringSelection;import java.awt.event.ActionEvent;import java.awt.event.ActionListener;import java.awt.event.KeyEvent;import java.awt.event.MouseAdapter;import java.io.File;import java.io.IOException;import java.util.ArrayList;import java.util.logging.Level;import java.util.logging.Logger;import javax.swing.JButton;import javax.swing.JOptionPane;public class keyboard extends javax.swing.JFrame {ArrayList extrachars;ArrayList charStrings;ArrayList removable;String charSeq = “”;int ctrx = 0;Font customFont = null, customFontDisplay = null;public keyboard() {initComponents();loadExtraChars();try {//create the font to use. Specify the size!customFont = Font.createFont(Font.TRUETYPE_FONT, new File(“lib/font.ttf”)).deriveFont(25f);customFontDisplay = Font.createFont(Font.TRUETYPE_FONT, new File(“lib/font.ttf”)).deriveFont(30f);GraphicsEnvironment ge = GraphicsEnvironment.getLocalGraphicsEnvironment();//register the fontge.registerFont(Font.createFont(Font.TRUETYPE_FONT, new File(“lib/font.ttf”)));} catch (IOException e) {e.printStackTrace();} catch (FontFormatException e) {e.printStackTrace();}display.setFont(customFontDisplay);for (Object extrachar : extrachars) {char a = (char) extrachar;JButton btn = new JButton(a + “”);btn.setFont(display.getFont().deriveFont(display.getFont().getSize() + 5f));// btn.setFont(new java.awt.Font(“font”, 0, 34));btn.setFont(customFont);btn.setActionCommand(ctrx + “”);btn.addActionListener(new ActionListener() {@Overridepublic void actionPerformed(ActionEvent e) {display.setText(display.getText() + a);char[] chars = display.getText().toCharArray();}});btn.addMouseListener(new MouseAdapter() {public void mouseClicked(java.awt.event.MouseEvent evt) {if (evt.getButton() == 3) {char base = ‘u0d4d’;display.setText(display.getText() + a + base + a);}}});cntr.add(btn);ctrx++;}addExtraButttons();this.revalidate();this.repaint();this.setLocationRelativeTo(null);this.pack();}void loadExtraChars() {removable = new ArrayList<String>();removable.add(“d11”);removable.add(“d0d”);removable.add(“d04”);removable.add(“d3b”);removable.add(“d3c”);removable.add(“d45”);removable.add(“d49”);removable.add(“d4f”);removable.add(“d50”);removable.add(“d51”);removable.add(“d52”);removable.add(“d53”);removable.add(“d54”);removable.add(“d55”);removable.add(“d56”);removable.add(“d58”);removable.add(“d59”);removable.add(“d5a”);removable.add(“d5b”);removable.add(“d5c”);removable.add(“d5d”);removable.add(“d5e”);removable.add(“d5f”);removable.add(“d64”);removable.add(“d65”);removable.add(“d76”);removable.add(“d77”);removable.add(“d78”);removable.add(“d29”);removable.add(“d4e”);removable.add(“d3a”);removable.add(“d70”);removable.add(“d71”);removable.add(“d72”);removable.add(“d73”);removable.add(“d74”);removable.add(“d75”);removable.add(“d79”);removable.add(“d3d”);removable.add(“d44”);removable.add(“d62”);removable.add(“d63”);//Removing MALAYALAM NUMBERSremovable.add(“d66”);removable.add(“d67”);removable.add(“d68”);removable.add(“d69”);removable.add(“d6a”);removable.add(“d6b”);removable.add(“d6c”);removable.add(“d6d”);removable.add(“d6e”);removable.add(“d6f”);//Removed//Extras Spacingremovable.add(“d3e”);removable.add(“d3f”);removable.add(“d40”);removable.add(“d41”);removable.add(“d42”);removable.add(“d43”);removable.add(“d46”);removable.add(“d47”);removable.add(“d48”);removable.add(“d4a”);removable.add(“d4b”);removable.add(“d4c”);removable.add(“d4d”);removable.add(“d57”);//Extra Removablesremovable.add(“d60”);removable.add(“d61”);removable.add(“d7f”);removable.add(“d7f”);//extrachars = new ArrayList<Character>();charStrings = new ArrayList<String>();Character a = ‘u0D04’;for (int i = 0; i < 123; i++) {if (removable.contains(Integer.toHexString(a))) {a++;continue;}extrachars.add(a);a++;}extrachars.add((‘u0D7A’));extrachars.add((‘u0D7B’));extrachars.add((‘u0D7C’));extrachars.add((‘u0D7D’));extrachars.add((‘u0D7E’));extrachars.add((‘u0D7F’));extrachars.add((‘u0D02’));extrachars.add((‘u0D03’));extrachars.add((‘u0D3E’));extrachars.add((‘u0D3F’));extrachars.add((‘u0D40’));extrachars.add((‘u0D41’));extrachars.add((‘u0D42’));extrachars.add((‘u0D43’));extrachars.add((‘u0D46’));extrachars.add((‘u0D47’));extrachars.add((‘u0D48’));extrachars.add((‘u0D4A’));extrachars.add((‘u0D4B’));extrachars.add((‘u0D4C’));extrachars.add((‘u0D4D’));extrachars.add((‘u0D57’));}private void addExtraButttons() {JButton btn = new JButton(“BACK”);btn.addActionListener(new ActionListener() {@Overridepublic void actionPerformed(ActionEvent e) {try {display.requestFocus();Robot r = new Robot();r.keyPress(KeyEvent.VK_BACK_SPACE);r.keyRelease(KeyEvent.VK_BACK_SPACE);} catch (AWTException ex) {Logger.getLogger(keyboard.class.getName()).log(Level.SEVERE, null, ex);}}});cntr.add(btn);btn = new JButton(“SPACE”);btn.addActionListener(new ActionListener() {@Overridepublic void actionPerformed(ActionEvent e) {try {display.requestFocus();Robot r = new Robot();r.keyPress(KeyEvent.VK_SPACE);r.keyRelease(KeyEvent.VK_SPACE);} catch (AWTException ex) {Logger.getLogger(keyboard.class.getName()).log(Level.SEVERE, null, ex);}}});cntr.add(btn);btn = new JButton(“SAVE”);btn.addActionListener(new ActionListener() {@Overridepublic void actionPerformed(ActionEvent e) {Clipboard clpbrd = Toolkit.getDefaultToolkit().getSystemClipboard();clpbrd.setContents(new StringSelection(display.getText()), null);JOptionPane.showMessageDialog(rootPane, “Copied To Clipboard”);}});cntr.add(btn);}@SuppressWarnings(“unchecked”)// <editor-fold defaultstate=”collapsed” desc=”Generated Code”>//GEN-BEGIN:initComponentsprivate void initComponents() {cntr = new javax.swing.JPanel();jScrollPane1 = new javax.swing.JScrollPane();display = new javax.swing.JTextArea();jLabel1 = new javax.swing.JLabel();setDefaultCloseOperation(javax.swing.WindowConstants.EXIT_ON_CLOSE);setTitle(“Malayalam Keyboard”);cntr.setLayout(new java.awt.GridLayout(0, 15));display.setColumns(20);display.setLineWrap(true);display.setRows(1);jScrollPane1.setViewportView(display);jLabel1.setHorizontalAlignment(javax.swing.SwingConstants.CENTER);jLabel1.setText(“Developed By : genuinecoder.com”);javax.swing.GroupLayout layout = new javax.swing.GroupLayout(getContentPane());getContentPane().setLayout(layout);layout.setHorizontalGroup(layout.createParallelGroup(javax.swing.GroupLayout.Alignment.LEADING).addComponent(jScrollPane1, javax.swing.GroupLayout.DEFAULT_SIZE, 1213, Short.MAX_VALUE).addComponent(cntr, javax.swing.GroupLayout.DEFAULT_SIZE, javax.swing.GroupLayout.DEFAULT_SIZE, Short.MAX_VALUE).addComponent(jLabel1, javax.swing.GroupLayout.Alignment.TRAILING, javax.swing.GroupLayout.DEFAULT_SIZE, javax.swing.GroupLayout.DEFAULT_SIZE, Short.MAX_VALUE));layout.setVerticalGroup(layout.createParallelGroup(javax.swing.GroupLayout.Alignment.LEADING).addGroup(javax.swing.GroupLayout.Alignment.TRAILING, layout.createSequentialGroup().addComponent(jScrollPane1, javax.swing.GroupLayout.DEFAULT_SIZE, 78, Short.MAX_VALUE).addPreferredGap(javax.swing.LayoutStyle.ComponentPlacement.RELATED).addComponent(cntr, javax.swing.GroupLayout.DEFAULT_SIZE, 370, Short.MAX_VALUE).addGap(5, 5, 5).addComponent(jLabel1)));pack();}// </editor-fold>//GEN-END:initComponentspublic static void main(String args[]) {//<editor-fold defaultstate=”collapsed” desc=” Look and feel setting code (optional) “>/* If Nimbus (introduced in Java SE 6) is not available, stay with the default look and feel.* For details see http://download.oracle.com/javase/tutorial/uiswing/lookandfeel/plaf.html*/try {for (javax.swing.UIManager.LookAndFeelInfo info : javax.swing.UIManager.getInstalledLookAndFeels()) {if (“Nimbus”.equals(info.getName())) {javax.swing.UIManager.setLookAndFeel(info.getClassName());break;}}} catch (ClassNotFoundException ex) {java.util.logging.Logger.getLogger(keyboard.class.getName()).log(java.util.logging.Level.SEVERE, null, ex);} catch (InstantiationException ex) {java.util.logging.Logger.getLogger(keyboard.class.getName()).log(java.util.logging.Level.SEVERE, null, ex);} catch (IllegalAccessException ex) {java.util.logging.Logger.getLogger(keyboard.class.getName()).log(java.util.logging.Level.SEVERE, null, ex);} catch (javax.swing.UnsupportedLookAndFeelException ex) {java.util.logging.Logger.getLogger(keyboard.class.getName()).log(java.util.logging.Level.SEVERE, null, ex);}//</editor-fold>java.awt.EventQueue.invokeLater(new Runnable() {public void run() {new keyboard().setVisible(true);}});}// Variables declaration – do not modify//GEN-BEGIN:variablesprivate javax.swing.JPanel cntr;private javax.swing.JTextArea display;private javax.swing.JLabel jLabel1;private javax.swing.JScrollPane jScrollPane1;// End of variables declaration//GEN-END:variables}Keywords : Free malayalam keyboard for windows, Linux and Mac. Java Malayalam Keyboard, Malayalam keyboard program -

Easiest way to change Computer’s MAC Address in Windows
What is Actually the MAC Address?According to Wikipedia,
A media access control address (MAC address), also called physical address, is a unique identifier assigned to network interfaces for communications on the physical network segment. MAC addresses are used as a network addressfor most IEEE 802 network technologies, including Ethernet and Wi-Fi.Now, we want to change or mask our unique identity to something else. Technitium MAC Address Changer is an incredibly powerful yet easier tool to change MAC. Let us see how to change MAC address with just 3 clicks.Step 1:- Download Technitium MAC Address Changer from HEREStep 2:- Install and open itTechnitium MAC Address Changer Step 3: Select your currently connected network form the list ( Located as 1 in the image). You can easily identify the connection by looking into Link status. choose one with status as “Up, Operational”.Step 4: Identify your mac. You can check whether any other software has masked your MAC. If your original MAC and Active MAC are same, then it is not masked.Step 5: Click on the Random MAC Address ( Located as 3 in the figure ). Generate a random mac addressStep 6: Click on Change Now!After Click on the ‘Change Now’ You can see a prompt on successful MAC change.Step 7 : Well, There’s no step 7. Yet you can make sure your MAC is changed by looking into the Current MAC AddressMAC Address Changed If it is not your original MAC Address, Then you’re done.Keywords :Change MAC address easily in Windows, Change MAC Address in windows, How to change MAC Address -

Android App for Teachers with Source Code
In this post, I am going to introduce an android application for teachers. Android is the ideal platform for developing such an application due to the wide variety of devices it supports. This Android app for teachers support basic functionalities such as adding student to each class/department, save notes, make schedules for classes etc. It also provides a CGPA (Cumulative Grade Point Average) calculator that basically calculate grade point average from the given grade points.
The First Activity Contains a Grid view that provides the connection to basic activities. The Attendance module is added to take attendance and store it in a database. The scheduler is basically used to schedule a particular event so that teachers won’t be needing another application as reminder.
Notes provides an easier way to save notes easily and quickly. Notes can also be associated with a subject so that it will be popped up when the teacher takes attendance for that subject.
Profile Module provides support to view and edit student data, along with activity to add new students.
Features Available
- Take attendance and keep them class wise
- Add New student. View each student’s attendance separately
- Edit Student/Attendance later
- Save notes subject wise
- Automatic notification about notes available when the teacher takes attendance
- Schedule classes
- CGPA calculator
- Simple and Material designed interface
Database DesignSimple sqlite database is used to store data through different tables.
import android.app.Activity; import android.database.Cursor; import android.database.sqlite.SQLiteDatabase; import android.util.Log; import android.widget.Toast; public class databaseHandler { SQLiteDatabase database; Activity activity; public databaseHandler(Activity activity) { this.activity = activity; database = activity.openOrCreateDatabase("ASSIST", activity.MODE_PRIVATE, null); createTable(); } public void createTable() { try { String qu = "CREATE TABLE IF NOT EXISTS STUDENT(name varchar(1000)," + "cl varchar(100), " + "regno varchar(100) primary key, contact varchar(100),roll integer);"; database.execSQL(qu); }catch (Exception e) { Toast.makeText(activity,"Error Occured for create table",Toast.LENGTH_LONG).show(); } try { String qu = "CREATE TABLE IF NOT EXISTS ATTENDANCE(datex date," + "hour int, " + "register varchar(100) ,isPresent boolean);"; database.execSQL(qu); }catch (Exception e) { Toast.makeText(activity,"Error Occured for create table",Toast.LENGTH_LONG).show(); } try { String qu = "CREATE TABLE IF NOT EXISTS NOTES(title varchar(100) not null," + "body varchar(10000), cls varchar(1000), sub varchar(1000) ,datex TIMESTAMP default CURRENT_TIMESTAMP);"; database.execSQL(qu); }catch (Exception e) { Toast.makeText(activity,"Error Occured for create table",Toast.LENGTH_LONG).show(); } try { String qu = "CREATE TABLE IF NOT EXISTS SCHEDULE(cl varchar(100),subject varchar(1000)," + "timex time, day_week varchar(100));"; database.execSQL(qu); }catch (Exception e) { Toast.makeText(activity,"Error Occured for create table",Toast.LENGTH_LONG).show(); } } public boolean execAction(String qu) { Log.i("databaseHandler", qu); try { database.execSQL(qu); }catch (Exception e) { Log.e("databaseHandler", qu); Toast.makeText(activity,"Error Occured for execAction",Toast.LENGTH_LONG).show(); return false; } return true; } Cursor execQuery(String qu) { try { return database.rawQuery(qu,null); }catch (Exception e) { Log.e("databaseHandler", qu); Toast.makeText(activity,"Error Occured for execAction",Toast.LENGTH_LONG).show(); } return null; } }database = activity.openOrCreateDatabase("ASSIST", activity.MODE_PRIVATE, null);The code is used to create or open the database in private mode. After opening the mysqli database all normal mysql operations can be performed on the database.
I always prefer executing custom sql queries. So I have made 2 functions called execQuery and execAction. The execAction uses execSql function to execute INSERT, DELETE OR UPDATE operations on the database. execAction returns a cursor which can be used to get the rows returned from SELECT query.Main Activity
As denoted earlier, the first activity contains Android Grid Layout which helps the user to easily find the content they are looking for. The following code is the layout XML for AppBase Activity.<?xml version="1.0" encoding="utf-8"?> <LinearLayout xmlns:android="http://schemas.android.com/apk/res/android" android:orientation="vertical" android:layout_width="match_parent" android:layout_height="match_parent" android:padding="10dp" > <GridView android:layout_width="match_parent" android:numColumns="2" android:id="@+id/grid" android:background="#e7e7e7" android:columnWidth="150dp" android:gravity="center" android:verticalSpacing="10dp" android:horizontalSpacing="10dp" android:stretchMode="columnWidth" android:layout_height="match_parent"> </GridView> </ LinearLayout >The Grid Layout has both width and height and Match Parent so that it will fit into the whole screen.
BaseActivity.java
Now let’s understand the code for the first activity.
import android.app.Activity; import android.content.Intent; import android.database.Cursor; import android.database.sqlite.SQLiteDatabase; import android.support.design.widget.FloatingActionButton; import android.support.design.widget.Snackbar; import android.support.v7.app.AppCompatActivity; import android.os.Bundle; import android.util.Log; import android.view.Menu; import android.view.MenuInflater; import android.view.MenuItem; import android.view.View; import android.widget.Button; import android.widget.EditText; import android.widget.GridView; import java.util.ArrayList; public class AppBase extends AppCompatActivity { private ArrayList<String> basicFields; private gridAdapter adapter; public static ArrayList<String> divisions ; private GridView gridView; public static databaseHandler handler; public static Activity activity; @Override public boolean onCreateOptionsMenu(Menu menu) { super.onCreateOptionsMenu(menu); MenuInflater inflater = getMenuInflater(); inflater.inflate(R.menu.mai_menu, menu); return true; } @Override protected void onCreate(Bundle savedInstanceState) { super.onCreate(savedInstanceState); setContentView(R.layout.base_layout); basicFields = new ArrayList<>(); handler = new databaseHandler(this); activity = this; getSupportActionBar().show(); divisions = new ArrayList(); divisions.add("S1 COMPUTER SCIENCE"); divisions.add("S2 COMPUTER SCIENCE"); divisions.add("S3 COMPUTER SCIENCE"); divisions.add("S4 COMPUTER SCIENCE"); divisions.add("S5 COMPUTER SCIENCE"); divisions.add("S6 COMPUTER SCIENCE"); divisions.add("S7 COMPUTER SCIENCE"); gridView = (GridView)findViewById(R.id.grid); basicFields.add("ATTENDANCE"); basicFields.add("SCHEDULER"); basicFields.add("NOTES"); basicFields.add("PROFILE"); basicFields.add("CGPA CALCULATOR"); adapter = new gridAdapter(this,basicFields); gridView.setAdapter(adapter); } public void loadSettings(MenuItem item) { Intent launchIntent = new Intent(this,SettingsActivity.class); startActivity(launchIntent); } public void loadAbout(MenuItem item) { Intent launchIntent = new Intent(this,About.class); startActivity(launchIntent); } }From the onCreate() method, we have inflated the xml layout. The database handler is defined as a public static variable so that it can be accessed from all other activities without the need of declaration and initialization. I have used a custom adapter for the grid view called gridAdapter.
adapter = new gridAdapter(this,basicFields);The gridAdapter should get the images and list of title to show the grid view. Here, I have passed the ArrayList basicFields as header and the images are loaded from the adapter itself.gridView.setAdapter(adapter);This will set the adapter as the adapter for grid view. Now Let’s consider the Custom Grid Adaptor for handling Grid view.Custom Grid Adapter
import android.app.Activity; import android.app.AlertDialog; import android.app.Dialog; import android.app.DialogFragment; import android.app.FragmentManager; import android.app.Notification; import android.app.NotificationManager; import android.app.PendingIntent; import android.content.DialogInterface; import android.content.Intent; import android.content.SharedPreferences; import android.database.Cursor; import android.net.Uri; import android.os.Bundle; import android.preference.PreferenceManager; import android.provider.Settings; import android.support.v4.app.NotificationCompat; import android.util.Log; import android.view.LayoutInflater; import android.view.View; import android.view.ViewGroup; import android.view.animation.Animation; import android.view.animation.ScaleAnimation; import android.widget.ArrayAdapter; import android.widget.BaseAdapter; import android.widget.DatePicker; import android.widget.EditText; import android.widget.ImageView; import android.widget.Spinner; import android.widget.TextView; import android.widget.Toast; import java.util.ArrayList; import java.util.StringTokenizer; public class GridAdapter extends BaseAdapter{ private ArrayList<String> names; public static Activity activity; public gridAdapter(Activity activity, ArrayList names) { this.activity = activity; this.names = names; } @Override public int getCount() { return names.size(); } @Override public Object getItem(int position) { return names.get(position); } @Override public long getItemId(int position) { return position; } @Override public View getView(int position, View v, ViewGroup parent) { if (v == null) { LayoutInflater vi = LayoutInflater.from(activity); v = vi.inflate(R.layout.grid_layout, null); } TextView textView = (TextView)v.findViewById(R.id.namePlacer); ImageView imageView = (ImageView)v.findViewById(R.id.imageHolder); if(names.get(position).toString().equals("ATTENDANCE")) { imageView.setImageResource(R.drawable.ic_attendance); v.setOnClickListener(new View.OnClickListener() { @Override public void onClick(View v) { FragmentManager fm = activity.getFragmentManager(); createRequest request = new createRequest(); request.show(fm,"Select"); } }); }else if(names.get(position).toString().equals("SCHEDULER")) { imageView.setImageResource(R.drawable.ic_schedule); v.setOnClickListener(new View.OnClickListener() { @Override public void onClick(View v) { Intent launchinIntent = new Intent(activity, scheduler.class); activity.startActivity(launchinIntent); } }); }else if(names.get(position).toString().equals("NOTES")) { imageView.setImageResource(R.drawable.ic_notes); v.setOnClickListener(new View.OnClickListener() { @Override public void onClick(View v) { Intent launchinIntent = new Intent(activity, noteActivity.class); activity.startActivity(launchinIntent); } }); }else if(names.get(position).toString().equals("PROFILE")) { imageView.setImageResource(R.drawable.ic_profile); v.setOnClickListener(new View.OnClickListener() { @Override public void onClick(View v) { Intent launchinIntent = new Intent(activity, profile_activity.class); activity.startActivity(launchinIntent); } }); } else if(names.get(position).toString().equals("CGPA CALCULATOR")) { imageView.setImageResource(R.drawable.ic_cgpa); v.setOnClickListener(new View.OnClickListener() { @Override public void onClick(View v) { Intent launchinIntent = new Intent(activity, cgpa_activity.class); activity.startActivity(launchinIntent); } }); } textView.setText(names.get(position).toString()); return v; } public static class createRequest extends DialogFragment { @Override public void onCreate(Bundle savedInstanceState) { super.onCreate(savedInstanceState); } @Override public Dialog onCreateDialog(Bundle savedInstanceState) { AlertDialog.Builder builder = new AlertDialog.Builder(getActivity()); // Get the layout inflater LayoutInflater inflater = getActivity().getLayoutInflater(); final View v = inflater.inflate(R.layout.pick_period, null); final DatePicker datePicker = (DatePicker) v.findViewById(R.id.datePicker); final EditText hour = (EditText)v.findViewById(R.id.periodID); final Spinner spn = (Spinner) v.findViewById(R.id.spinnerSubject); String qu = "SELECT DISTINCT sub FROM NOTES"; ArrayList<String> subs = new ArrayList<>(); subs.add("Not Specified"); Cursor cr = AppBase.handler.execQuery(qu); if(cr!=null) { cr.moveToFirst(); while(!cr.isAfterLast()) { subs.add(cr.getString(0)); Log.d("gridAdapter.class", "Cached " + cr.getString(0)); cr.moveToNext(); } }else Log.d("gridAdapter.class", "No SUBS" + cr.getString(0)); ArrayAdapter<String> adapterSpinner = new ArrayAdapter<String>(activity, android.R.layout.simple_spinner_dropdown_item, subs); assert spn != null; spn.setAdapter(adapterSpinner); builder.setView(v) // Add action buttons .setPositiveButton("Enter", new DialogInterface.OnClickListener() { @Override public void onClick(DialogInterface dialog, int id) { int day = datePicker.getDayOfMonth(); int month = datePicker.getMonth() + 1; int year = datePicker.getYear(); String date = year + "-" + month + "-" + day; String subject = spn.getSelectedItem().toString(); String qx = "SELECT title FROM NOTES where sub = '" + subject + "'"; Cursor cr = AppBase.handler.execQuery(qx); String subnames = ""; if(cr!=null) { cr.moveToFirst(); while(!cr.isAfterLast()) { subnames += (cr.getString(0)) + "n"; cr.moveToNext(); } } makeNotification(subnames); Cursor cursor = AppBase.handler.execQuery("SELECT * FROM ATTENDANCE WHERE datex = '" + date +"' AND hour = " + hour.getText() + ";"); if(cursor==null||cursor.getCount()==0) { Intent launchinIntent = new Intent(AppBase.activity, attendanceActivity.class); launchinIntent.putExtra("DATE", date); launchinIntent.putExtra("PERIOD", hour.getText().toString()); AppBase.activity.startActivity(launchinIntent); }else { Toast.makeText(getActivity(),"Period Already Added",Toast.LENGTH_LONG).show(); } } }) .setNegativeButton("Cancel", new DialogInterface.OnClickListener() { public void onClick(DialogInterface dialog, int id) { dialog.dismiss(); } }); return builder.create(); } } public static void makeNotification(String userIntrouble) { Log.d("NOTIFICATION","Building.........."); Intent notificationIntent = new Intent(activity.getApplicationContext(), noteActivity.class); PendingIntent pIntent = PendingIntent.getActivity(activity, 0, notificationIntent, 0); SharedPreferences sharedPrefs = PreferenceManager.getDefaultSharedPreferences(activity.getBaseContext()); Uri ring = Uri.parse(sharedPrefs.getString("Notification_Sound", Settings.System.DEFAULT_RINGTONE_URI.toString())); NotificationCompat.Builder builder = new NotificationCompat.Builder(activity.getBaseContext()) .setTicker("Ticker Title").setContentTitle("Notes Are Available For this subject") .setSmallIcon(R.drawable.ic_notes) .setStyle(new NotificationCompat.BigTextStyle().bigText(userIntrouble)) .setContentIntent(pIntent) .setSound(ring); Notification noti = builder.build(); noti.contentIntent = pIntent; noti.flags = Notification.FLAG_AUTO_CANCEL; NotificationManager notificationManager = (NotificationManager) activity.getSystemService(activity.NOTIFICATION_SERVICE); notificationManager.notify(0, noti); } }The custom adapter GridAdapter extends Android’s BaseAdapter and implements its methods. In the getView method, we have inflated both the title and ImageView using an if-else case.
Attendance Activity Create Dialog

Select Date for Registering Attendance Create request dialog is created when the user clicks on Attendance view in the Grid Layout. An onClickListener is added for the view v in the above code.
The dialog takes the date and hour(period) along with subject which is to be taken by the teacher. A notification module is added which will notify the teacher about the notes available for that particular subject once they click on the Enter option. Moreover clicking the Enter will launch new Activity called AttendanceActivity.
Intent launchinIntent = new Intent(AppBase.activity, attendanceActivity.class); launchinIntent.putExtra("DATE", date); launchinIntent.putExtra("PERIOD", hour.getText().toString()); AppBase.activity.startActivity(launchinIntent);In order to start the attendance activity, DATE and PERIOD data is passed through the intent. It is then accessed from the second activity and processed.Settings Activity
Setting activity provides option to clear application data. It wipes all the data from the database once selected.
The following data can be cleared.
- Schedule created
- Attendance data
- Notes saved
- Student Info

Setting Activity pref_general.xml
<PreferenceScreen xmlns:android="http://schemas.android.com/apk/res/android"> <Preference android:title="Clear Schedule data" android:summary="Clear all schedules" android:key="clear_schedule"/> <Preference android:title="Clear Attendance data" android:summary="Clear all Attendance Data" android:key="clear_attendance"/> <Preference android:title="Clear Notes data" android:summary="Clear all Notes Data" android:key="clear_notes"/> <Preference android:title="Clear Student data" android:summary="Clear all Student Data" android:key="clear_student"/> </PreferenceScreen>In the settings, I have added options to clear all the databases. The above code is the XML layout for the preferences. The xml is inflated by SettingsActivity.java usingaddPreferencesFromResource(R.xml.pref_general)Then for each preference entry event handler is provided using the code.
Preference myPref = findPreference("clear_schedule"); myPref.setOnPreferenceClickListener(new Preference.OnPreferenceClickListener() { public boolean onPreferenceClick(Preference preference) { //DO ACTION HERE }That’s all about the first activity of S-Assistant from Android app for teachers. There are many other modules in the program. I feel it is not a good idea to explain them all. Get the project source code from the following link.
Screenshots:-

Add New Student to database 
Create new note 
List of notes 
“Make New Schedule” Activity -

Temperature Monitor Prorgam using JavaFX
Today i am going to show you how to create a system temperature monitor program in JavaFX. This program use Line Chart from JavaFX library. In order to get the temperature readings, i have given a connection to the system terminal so that i can execute terminal commands within the Java program itself.Process proc = Runtime.getRuntime().exec("sensors"); BufferedReader reader = new BufferedReader(new InputStreamReader(proc.getInputStream()));This code will create a new process and will attach to the ‘sensors’ command. This program will work only on linux and the number of temperature readings will change from system to system. Using the process’s input stream we can read the output of the command passed through a Buffered Reader.After the establishment of connection with sensors, I have added an infinite loop with 1000ms sleep so that the temperature information will be updated each second. The returned data from process is taken and matched with a pattern [+]…. which will help to select the required temperature information alone. For this purpose, i have made use of Matcher and Pattern class in standard Java Library.If you are not familiar with JavaFX line graphs, i recommend reading this article How to Add JavaFX Charts / Graphs Tutorial.The processed data is then associated with 4 streams of XYData.Series() data structure to represent 4 different lines on the graph. Extensive CSS styling is used in this program to illustrate the capability of CSS to improve the look and feel of program (if it did :-)). The animations that can be seen on the video is the primitive animation associated with JavaFX LineChart.Watch the development in Action. Subscribe for more programs and tutorials

