Month: November 2016

  • JavaFX Complete Project Tutorial : Building Material Designed Library Management Software

    JavaFX Complete Project Tutorial : Building Material Designed Library Management Software

    Programming can only be learned properly with continuous practice. When you work on a complete software project, you’ll have to understand how to put things together and how to implement data communication between various modules etc. So, I decided to share a complete javafx project development series.

    I am publishing a series of tutorial videos on YouTube about developing a complete Library Management Software using JavaFX. This tutorial series start with basic designing and continue towards more complex programming like database integration, multi level user interface design, material design etc. I have tried my best to keep things as simple as possible.

    Apache Derby database is used for storing member, book and other informations. Derby is a lightweight, purely java based relational database. It has common sql syntax. So you can get things done without any issues. I have used Scene Builder for designing user interfaces. Additionally CSS is used to get some nice effects for buttons, text fields etc.

    JavaFX Material Design Library Management Software
    Dashboard

    For development, I am using NetBeans IDE with Scene Builder. Make sure that you have the latest java installed. Some of the libraries used in the project requires JDK 8u40 or better. So it is better to have the latest java version installed.

    I hope you find this tutorial series useful. Learning component by component is a little tedious task. This set of videos will help you to understand how to coordinate various components together.  You can find the source code of this application at GitHub. I have committed at the end of  almost all tutorial videos so that you can find the exact code that i have used for explanation.

    Moving to Material Design

    Material design is an awesome concept. It defines a new method for designing and developing user interfaces across multiple platforms. For making this software materialistic, I have used JavaFX material design library named JFoenix. It provides built-in material design based components that can be easily styled with CSS.

    Material-design-login-screen
    Library Software login screen

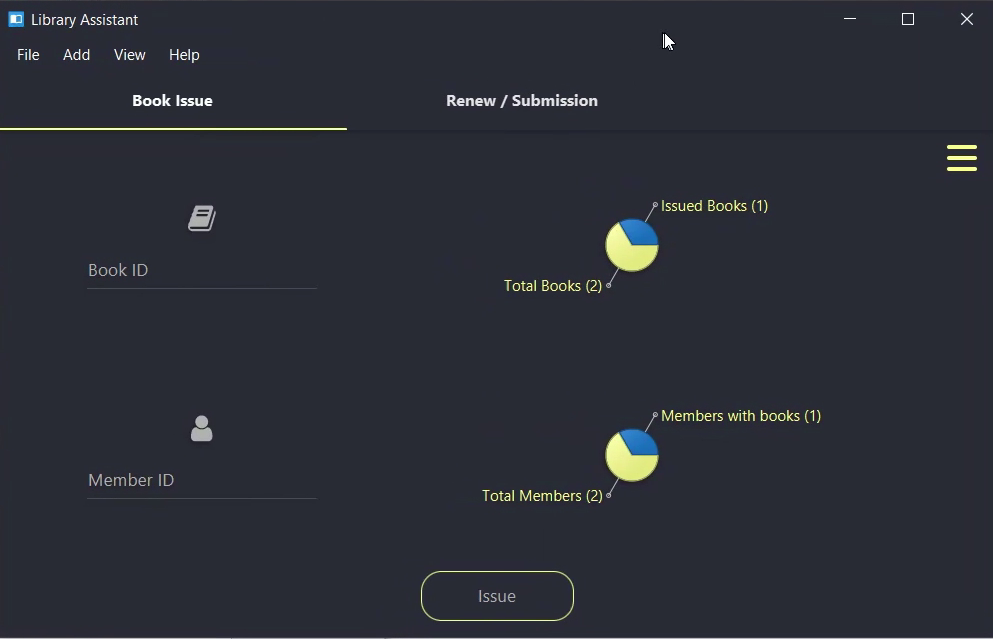
    The above image shows login screen from new design. There are only 3 colors and every components has it own padding and spacing.  If you just give enough spacing for your components on the screen, it will tremendously improve the overall look.

    Libraries Used

    I have recorded the complete development as tutorial. You can find them in the following PlayList. Subscribe to Genuine Coder YouTube channel for more tutorials in the future.

    Get project from GitHub
  • JavaFX : How to implement Drag and Drop

    JavaFX : How to implement Drag and Drop

    Drag and drop allows data transfer between various components in your javafx application. It allows transferring data in between your internal nodes or between two applications.

    A drag-and-drop gesture happens as follows: The user click a mouse button on a gesture source, drags the mouse, and releases the mouse button on a gesture target. While dragging the data, the user gets visual feedback, which denotes locations that do not accept the data and, when over a target that accepts the data, gives a hint where to drop the data.

    The data is transferred using a dragboard, which has the same interface as a system clipboard but is only used for the drag-and-drop data transfer.Various types of data can be transferred such as text, images, URLs, files, bytes, and strings.

    1. Receiving Data From other applications

    Receiving data from other applications through drag and drop is very simple in JavaFX. The method setOnDragOver  of node allows controlling what happens when something is dragged over the node. For example, as you can see in the top image, I have added a simple ImageView and implemented setOnDragOver to accept when files are dragged over it. Let’s see the code.

    imageView.setOnDragOver(new EventHandler() {
       public void handle(DragEvent event) {
          if (event.getDragboard().hasFiles()) {
             event.acceptTransferModes(TransferMode.ANY); 
          }
          event.consume();
       }
    });
    
    In this code, I have added event handler for the image view for Drag Over case. The getDragboard method gives the Dragboard object which contains the files being transferred. The method hasFiles() is invoked to make sure that, the dragged content is a file. This is done to avoid when something other than files are dragged, like string or rich text content.
    event.acceptTransferModes(TransferMode.ANY);
    
    This line makes the component ready to accept the incoming data. As a result, we will get a hand with a plus symbol when dragged over image view.
    The last thing we have to do is to accept the files when dropped. The method setOnDragDropped  allows to achieve this. In our case we have to do as follows.
    imageView.setOnDragDropped(new EventHandler<DragEvent>() {
        public void handle(DragEvent event) {
            List<File> files = event.getDragboard().getFiles();
            System.out.println("Got " + files.size() + " files");
            imageView.setImage(new Image(new FileInputStream(files.get(0))));
            
            event.consume();
         }
    });
    

    In this code, the list of incoming files is taken using event.getDragboard().getFiles() method. So we can send a list of file instead of a single one. From the received files, we have to create an image and set it as the image for the imageview.

    So, this is as simple as a drag and drop operation can get. Now let’s see how we can implement drag and drop for two internal nodes.
     
    2. Drag and Drop between two internal components
    For making a node ready to be dragged, we can use setOnDragDetected method. This function will be called whenver a drag operation is done on the component. Here, source is a Text variable that contains some text.
    When the source is dragged, The Dragboard class from javafx.scene.input.Dragboard is constructed by calling source.startDragAndDrop() method. Transfer modes define the type of transfer that happens between the gesture source and gesture target. Available transfer modes include COPY, MOVE, and LINK.
    Inorder to send data from the source an instance of ClipboardContent is used. Since we are sending String data, putString method is used. After setting the content, it is then associated with Dragboard db.
    Now source will allow dragging string data. ie, It act as a source.
    source.setOnDragDetected(new EventHandler<MouseEvent>() {
        public void handle(MouseEvent event) {
            Dragboard db = source.startDragAndDrop(TransferMode.ANY);
            
            ClipboardContent content = new ClipboardContent();
            content.putString(source.getText());
            db.setContent(content);
            
            event.consume();
        }
    });
    
    Now just like we did in the image view, we need to setup the Text at the destination ready to accept the incoming string. This can be done by using setOnDragOver and setOnDragDropped.
     
    Watch the complete tutorial about implementing Drag and Drop for your JavaFX Application.