Month: October 2018

  • JavaFX 3D Tutorial #12 – Depth Buffer

    JavaFX 3D Tutorial #12 – Depth Buffer

    So far, we have learned about the basics of 3D. We created 3D objects, prepared detailed textures, worked with animation etc. In this chapter, we will talk about the requirement of depth buffer.

    What is Depth Buffer?

    Depth buffering or Z-Buffering is a computer graphics technique used to determine surface depths at each pixel to decide which objects are visible. For example, when there are couple of objects in the scene graph, some edges of will be on top and some will be behind others. In order to identify and render these properly, it is important to fix the depth of each of the objects at each pixels.

    By default, in JavaFX Scenes, depth buffer is disabled. But, it can be easily enabled by using the following overridden constructor.

    Scene(Parent root, double width, double height, boolean depthBuffer)

    Just pass the final parameter as true and depth buffer will automatically enabled.

    SmartGroup group = new SmartGroup();
    group.getChildren().add(createBox());
    
    //Create new scene with depth buffer enabled
    Scene scene = new Scene(group, WIDTH, HEIGHT, true);


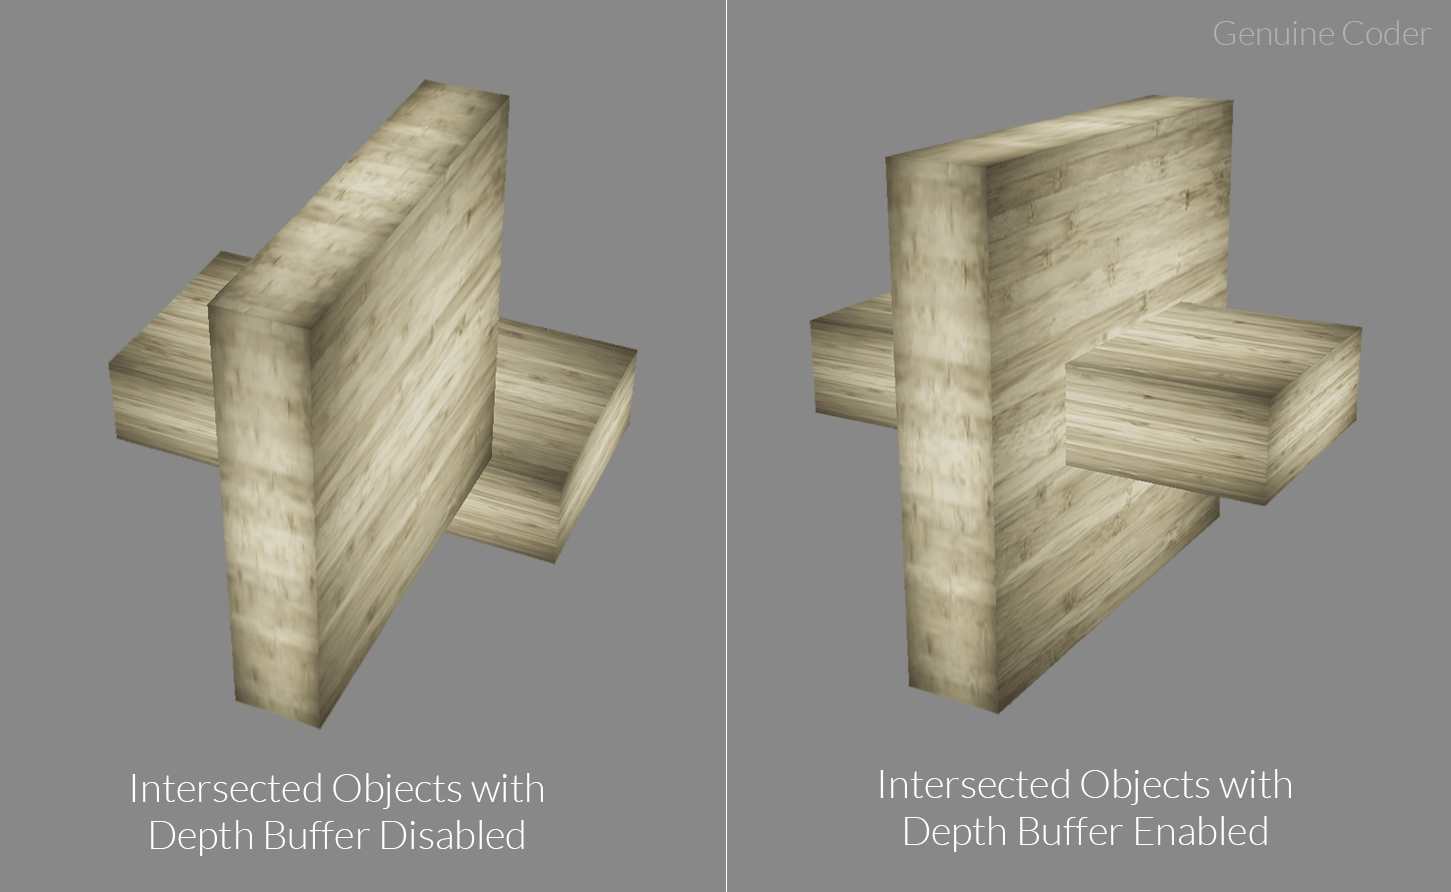
    Effects of not enabling depth buffer

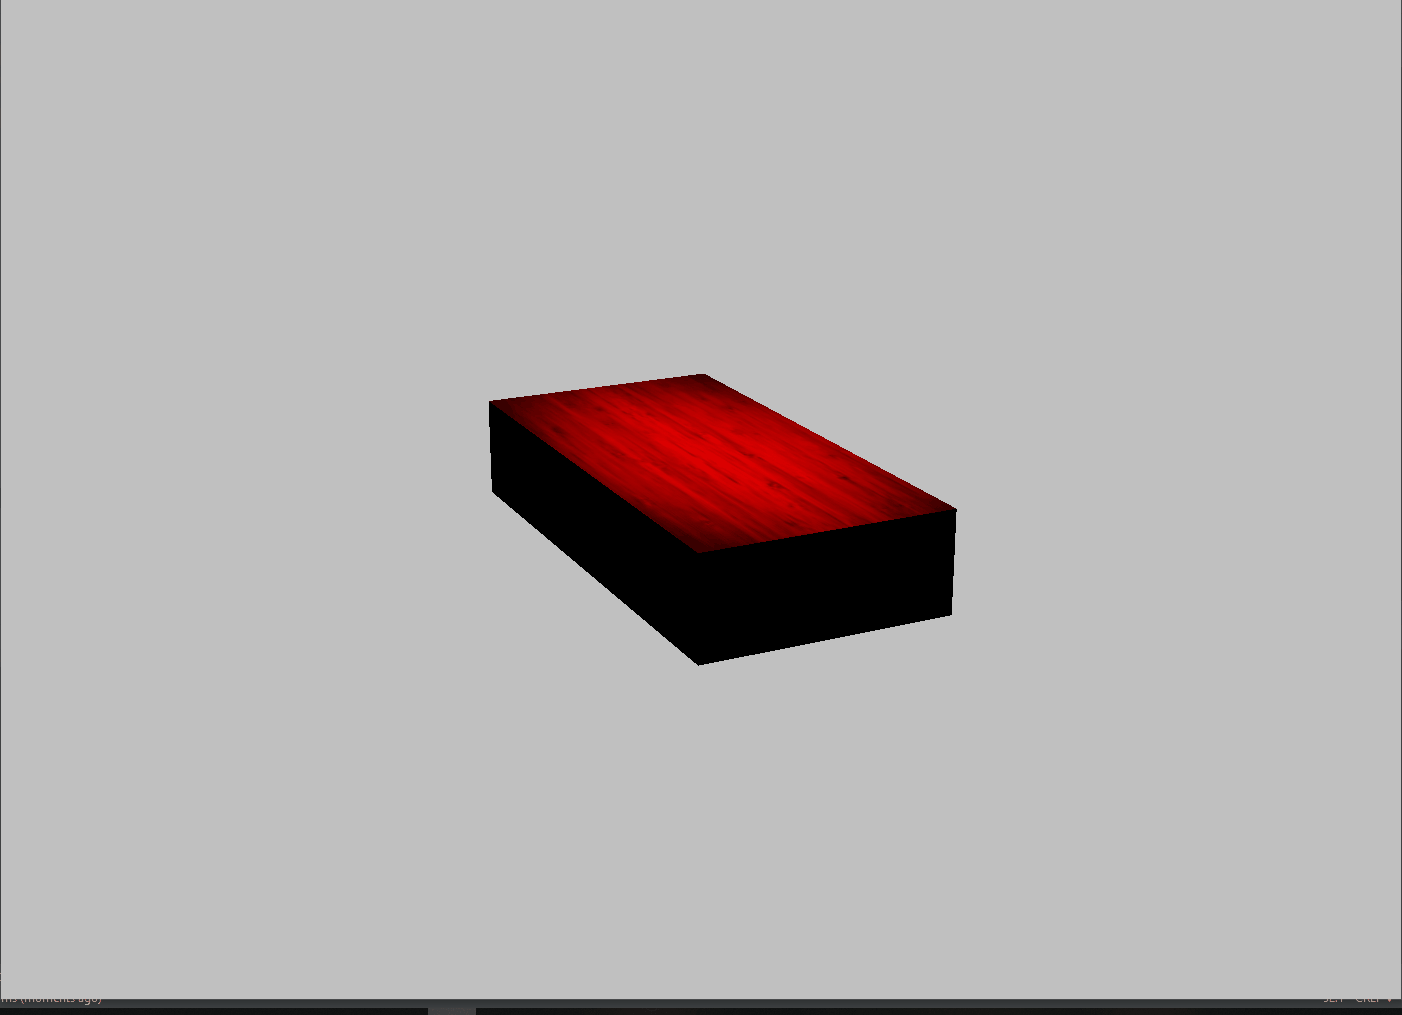
    Following image shows the effect of using depth buffer. In the first image (image on the left), the wooden boxes were supposed to merged. But, since depth buffer is not used, the rendering is not proper and they appear to be two different boxes. When depth buffer is enabled, it is rendered correctly as it can be seen in the second image.

    JavaFX Depth Buffer Enabled / Disabled

    Visit JavaFX 3D Course Index Page

  • JavaFX 3D Tutorial #11 – Bump Maps for Wringles

    JavaFX 3D Tutorial #11 – Bump Maps for Wringles

    In the last chapter, we saw how to create glowing objects with self illumination. In this chapter, we will see about bump mapping in JavaFX.

    Bump Maps

    According to Wikipedia, Bump mapping is a computer graphics technique for simulating bumps and wrinkles on the surface of an object. Surfaces are not always super smooth. They mostly have some form of deformations. Bump mapping allows to add this extra detail to the surface.

    JavaFX PhongMaterial provides option to set bump maps using the method.

    public final void setBumpMap(Image value)

    Let’s have a look at example code snippet.

    PhongMaterial material = new PhongMaterial();
    material.setDiffuseMap(new Image(getClass().getResourceAsStream("wood.jpg")));
    
    //Set bump map
    material.setBumpMap(new Image(getClass().getResourceAsStream("bumpMap.jpg")));
    
    Box box = new Box(100, 20, 50);
    box.setMaterial(material);
    return box;


    Visit JavaFX 3D Course Index Page

  • JavaFX 3D Tutorial #10 – Self Illumination

    JavaFX 3D Tutorial #10 – Self Illumination

    In JavaFX 3D, you can make use of self illumination maps to provide glowing effects for objects. Self illumination allows to add extra details for the objects.

    Self Illumination Map

    Self illumination map allows to add an additional glow to the image. You can see the effect in the following image.

    JavaFX Self Illumination Example

    JavaFX PhongMaterial provides an option to set illumination map using the method

    public final void setSelfIlluminationMap(Image value)

    It takes an image as parameter. The glow color will be the color used in image. A dark pixel doesn’t contribute to the glow. For example, in the above earth illumination case, I have used following illumination map.

    Earth’s illumination map


    PhongMaterial material = new PhongMaterial();
    material.setDiffuseMap(new Image(getClass().getResourceAsStream("wood.jpg")));
    
    //Set self illumination map
    material.setSelfIlluminationMap(new Image(getClass().getResourceAsStream("illuminationMap.jpg")));
    
    Box box = new Box(100, 20, 50);
    box.setMaterial(material);
    return box;


    Visit JavaFX 3D Course Index Page

  • JavaFX 3D Tutorial #9 – Moving Light Animation

    JavaFX 3D Tutorial #9 – Moving Light Animation

    In the last chapter, we saw how to add lights to the 3D scene. In this chapter, we will see how a moving light works.

    You can add as many lights as you need. To animate the light sources, you can use predefined animations from javafx.animation package like TranslateTransition, RotateTransition etc or custom animations can be applied. In this example, I will write a custom rotation animation to get the following effect.

    JavaFX Light Animation

    Moving Light Animation

    We can create the rotation effect for the light source using rotateProperty. The important thing here is to specify the axis of rotation. We have the freedom to rotate the object in 360 degrees. In this example, I am rotating light source about X Axis.

    AnimationTimer will be called during each frame rendered. We can update the transform properties of objects to create smooth animation. In this example, I have increased rotation angle of light source by 1 degree during each frame.

    You can speedup the animation by increasing the value ‘1’ to a higher one. Animation speed can be reduced by reducing the value.

    private Node[] prepareLightSource() {
        //Create point light
    	pointLight.setColor(Color.RED);
    	pointLight.getTransforms().add(new Translate(0, -50, 100));
    	//Set axis of rotation
    	pointLight.setRotationAxis(Rotate.X_AXIS);
    
    	//Create a small sphere to locate the light source (Light source is invisible)
    	Sphere sphere = new Sphere(2);
    	//Attach sphere transforms to point light. So they move/rotate together
    	sphere.getTransforms().setAll(pointLight.getTransforms());
    	sphere.rotateProperty().bind(pointLight.rotateProperty());
    	sphere.rotationAxisProperty().bind(pointLight.rotationAxisProperty());
    
    	//Return lights
    	return new Node[]{pointLight, sphere};
    }
    
    @Override
    public void start(Stage primaryStage) {
    	Box box = prepareBox();
    
    	SmartGroup group = new SmartGroup();
    	group.getChildren().add(box);
    	//Add light and sphere
    	group.getChildren().addAll(prepareLightSource());
    
    	Camera camera = new PerspectiveCamera(true);
    	camera.setNearClip(1);
    	camera.setFarClip(1000);
    	camera.translateZProperty().set(-200);
    
    	Scene scene = new Scene(group, WIDTH, HEIGHT);
    	scene.setFill(Color.SILVER);
    	scene.setCamera(camera);
    
    	group.translateXProperty().set(0);
    	group.translateYProperty().set(0);
    	group.translateZProperty().set(0);
    
    	initMouseControl(group, scene, primaryStage);
    
    	primaryStage.setTitle("Genuine Coder");
    	primaryStage.setScene(scene);
    	primaryStage.show();
    
    	//Create animation timer
    	AnimationTimer timer = new AnimationTimer() {
    	  @Override
    	  public void handle(long now) {
    		//Increase rotation angle by 1 degree during each frame.
    		pointLight.setRotate(pointLight.getRotate() + 1);
    	  }
    	};
    	//Start animation automatically during startup
    	timer.start();
    }


    Visit JavaFX 3D Course Index Page

  • JavaFX 3D Tutorial #8 – Lighting with PointLight and AmbientLight

    JavaFX 3D Tutorial #8 – Lighting with PointLight and AmbientLight

    In this chapter, we will see how to add lighting to the JavaFX 3D. Lighting is one of the most important parts in 3D application development since it decides what should be visible at a point of time.

    JavaFX provides two options for lighting. One is AmbientLight and another one is PointLight.

    Ambient Light

    An ambient light radiates lights equally in all directions. When it is used, all the surfaces of the 3D object get equal amount of light. It can be considered as a natural default light.

    Let’s see how we can add Ambient Light. You can give the color of the light by using setColor() method.

    private LightBase prepareLightSource() {
            //Create light object
    	AmbientLight light = new AmbientLight();
    	//Set light color
    	light.setColor(Color.DEEPSKYBLUE);
    	return light;
    }
    

    Screenshot:-

    Point Light

    A point light can be considered as a light bulb that emits light in all directions. You can think of a point light as a sphere of light filling an area. Objects closer to the light will be brighter, and objects further away will be darker. JavaFX allows to add point light using javafx.scene.PointLight class.

    private LightBase prepareLightSource() {
    	//Create point light
    	PointLight pointLight = new PointLight();
    	//Set light color
    	pointLight.setColor(Color.RED);
    	//Set location of light source
    	pointLight.getTransforms().add(new Translate(0,-50,100));
    }
    

    Screenshot:-

    Visit JavaFX 3D Course Index Page

  • JavaFX 3D Tutorial #7 – Reflection with Specular Map

    JavaFX 3D Tutorial #7 – Reflection with Specular Map

    In the 6th chapter, we talked about giving wooden texture to the object. Today, let us see how to give reflection to surfaces in JavaFX 3D. JavaFX provides option to specify specular maps as either image or a color.

    Specular Map

    Specular maps allows to define a surface’s shininess and highlight colour. The higher the value of a pixel (from black to white), the shinier the surface will appear. Black provides zero reflection and white provides total reflection.

    If you want the surface to be having uniform reflection, then use a specular color with Material#setSpecularColor(Color color). Or use Material#setSpecularImage(Image image).

    Let’s have a look at the example code.

    private Box prepareBox() {
       PhongMaterial material = new PhongMaterial();
       //Set diffuse map
       material.setDiffuseMap(new Image(getClass().getResourceAsStream("/resources/wood.jpg")));
       //Set specular map
       material.setSpecularMap(new Image(getClass().getResourceAsStream("/resources/illuminati.jpg")));
    
       Box box = new Box(100, 20, 50);
       box.setMaterial(material);
       return box;
    }
    

    and the result will be

    JavaFX 3D Box with Reflection


    Specular Map used


    Visit JavaFX 3D Course Index Page

    Meta titles: JavaFX Reflection, JavaFX 3D Specular Map