Month: May 2016

  • JavaFX Material Design : Setting Up and Making Login Application

    JavaFX Material Design : Setting Up and Making Login Application

    One problem I have faced when developing java applications was the old look. Even after the introduction of Nimbus look and feel, the user interface components felt too static and dead. Then JavaFX came in to the scene and provided a much better interface and control elements.

    In this post, I would like to discuss on how to design our JavaFX applications using material design components. The developers at JFoenix had done an impressive job on developing material library for JavaFX. All that we have to do is to download the library and add it into Scene Builder and our application. I have made a video tutorial on setting-up the JFoenix library and making a material login interface.

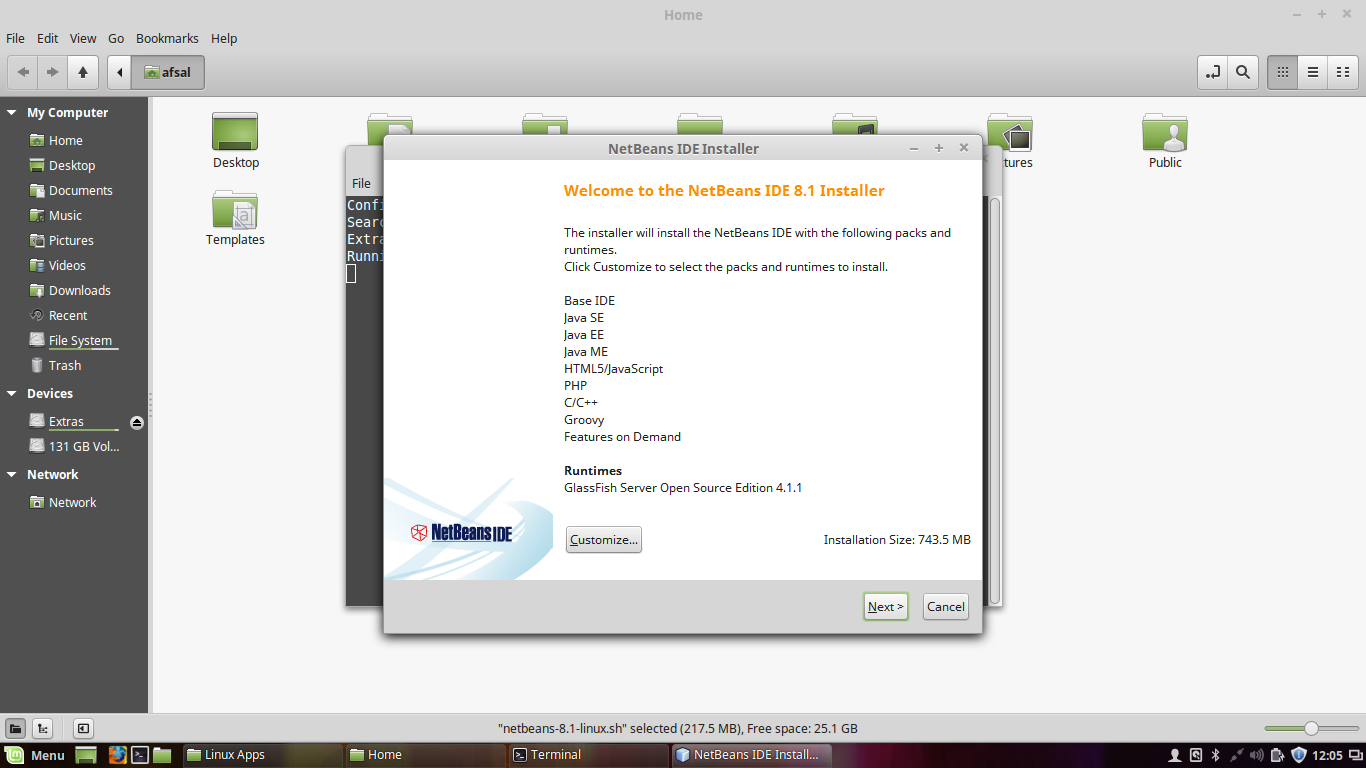
    Adding JFoenix to Scene Builder

    First, download the library from https://github.com/jfoenixadmin/Jfoenix. Once you get the Jar file, you have to add it into Scene Builder. Once you add this library to Scene Builder, you can use components available in JFoenix library in your project with just drag and drop.

    Within SceneBuilder GUI, there is a setting button, as you can see in the following screenshot. Once you click on it, you will get a context menu. Select JAR/FXML manager which will open the library manager window.

    JavaFX Scene Builder add external jar
    JavaFX Scene Builder JAR/FXML manager

    Then, select Add Library/FXML from file system from the window. This will open a file selection window. Select the JFoenix Jar file. This will open another window listing all the components available in the library. Just select all. Once you successfully add this library, it can be seen under installed libraries/FXML files list.

    Scene Builder Library Manager
    External  library window

    After adding the components to Scene Builder, It’s pretty much drag drop. For JFXButton, you can set ripples, set it as RAISED…. oh my goodness! I have been developing desktop applications for a long time and this is the first time getting my hands on these much cool UI components. 

    Watch Video Tutorial about using JFoenix library to make a login Application

    I have posted a video tutorial in Genuine Coder YouTube channel about using JFoenix library. Watch it right from here.

    Download Sample Project Source Code : Google Drive
    Download Sample Project Application : Google Drive

    Complete JFoenix Components Tutorial

    Watch JFoenix tutorial from following playlist. Contains 19 videos about JFoenix components.

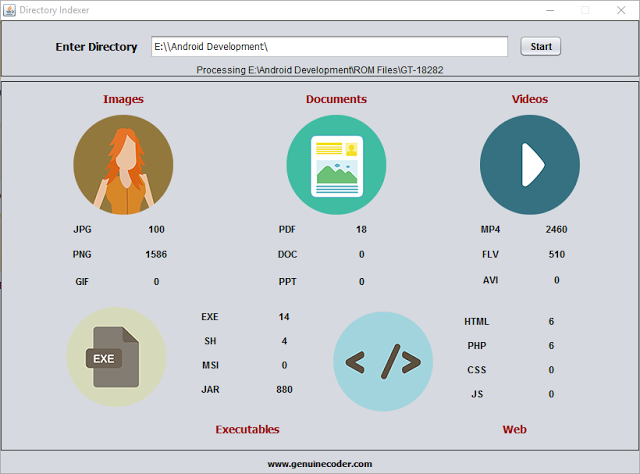
    JavaFX Material Design Library Management Software Development

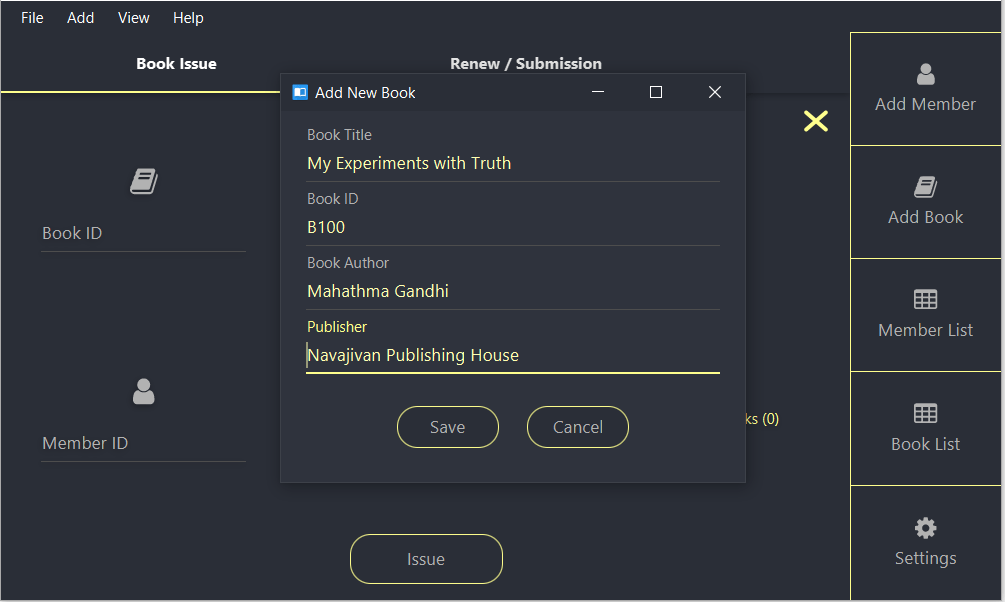
    I have created a complete library management program using JavaFX and JFoenix based on Material Design. The Complete tutorial of the development is available in Genuine Coder YouTube Channel.  Read more about this project

    JavaFX Library Management Software
    JavaFX Library Management Software

    Material UI Components available in JFoenix

      • JFXBadge
      • JFXButton
      • JFXCheckBox
      • JFXColorPicker
      • JFXComboBox
      • JFXDatePicker
      • JFXDialog
      • JFXDialogLayout
      • JFXDrawer
      • JFXDrawerStack
      • JFXHamburger
      • JFXListCell
      • JFXListView
      • JFXNodesList
      • JFXPasswordField
      • JFXPopup
      • JFXProgressbar
      • JFXRadioButton
      • JFXRippler
      • JFXSlider
      • JFXSnackbar
      • JFXSpinner
      • JFXTabPane
      • JFXTextArea
      • JFXTextField
      • JFXToggleButton
      • JFXToggleNode
      • JFXTogglePane
      • JFXToolbar
      • JFXTreeTableCell
      • JFXTreeTableRow
      • JFXTreeTableView
      • NumberValidator
      • RequireFieldValidator
         
  • How to add JavaFX Charts / Graphs : Tutorial

    How to add JavaFX Charts / Graphs : Tutorial

    JavaFX provides a powerful set of Charts/Graphs that can be added very easily to your programs. Frankly, It is even easier than adding a Table in JavaFX. Graphical charts are available in the javafx.scene.chart package.

    Bar Chart

    This video describes how to add Bar Chart to your JavaFX program.

    Bar Chart data can be represented using an XYChart.Series object. All that you have to do is to make a new object and add data to it.

    XYChart.Series set1 = new XYChart.Series<>();

    Data can be added to this set using the code. Here XYChart.Data() takes two parameters. First one is for the X-Axis(Horizontal) and the second one is for Y-Axis(Vertical).

    set1.getData().add(new XYChart.Data("James", 5000));
    set1.getData().add(new XYChart.Data("Alice", 10000));
    set1.getData().add(new XYChart.Data("Alex", 2000));

    Finally, Connect the created series with your JavaFX Bar Chart object using getData().addAll() method.  

    SalaryChart.getData().addAll(set1);

    AddAll() method allows to add more than one series of data to your chart. For example if i have set1,set2 and set3 then i can add all of them by using a comma seperated list.

    SalaryChart.getData().addAll(set1,set2,set3);

    Pie Chart

    JavaFX Pie Chart uses an ObservableList which is very similar to XYSeries.Series we used for Bar Chart. This video explains how to use pie chart.

    ObservableList<PieChart.Data> pieChartData
    = FXCollections.observableArrayList(
    new PieChart.Data("Cars", 13),
    new PieChart.Data("Bikes", 25),
    new PieChart.Data("Buses", 10),
    new PieChart.Data("Cycles", 22));
    pieChart.setData(pieChartData);

    Here i have created an ObservableList and added 4 values. The pie chart takes all of these values and allocate a percentage for each one.

    For eg, Percentage of cars = 13/(13+25+10+22) = 18.5%

    The data then can be associated with the chart using the same code used for Bar chart or using a simple alternative

    pieChart.setData(pieChartData);

    provided, pieChart is the Pie Chart object and pieChartData is the ObservableList.

    Line Chart

    Construction of Line Chart in Java is very much similar to Bar Chart. It takes the same XYChart.Series object.

    XYChart.Series series = new XYChart.Series(); //Make a new XYChart object
    //Add Data
    series.getData().add(new XYChart.Data(“1”, 23));
    series.getData().add(new XYChart.Data(“2”, 14));
    series.getData().add(new XYChart.Data(“3”, 15));

    Finally, associate the data with Line Chart.

    LineChart.getData().addAll(series);

    Area Chart and Scatter Chart

    These two are explained together because, both of these Charts takes same type of data. Yes, the XYChart.Series object. We can use the same example used above.

    XYChart.Series series = new XYChart.Series(); //Make a new XYChart object
    //Add Data
    series.getData().add(new XYChart.Data(“1”, 23));
    series.getData().add(new XYChart.Data(“2”, 14));
    series.getData().add(new XYChart.Data(“3”, 15));

    Finally, associate the data with both charts.

    AreaChart.getData().addAll(series);
    ScatterChart.getData().addAll(series);

    So that’s how we add a chart /Graph to our JavaFX program and i hope you understood these things well enough.

    ———————————————————————————————–
    Thanks to our sponsor
    https://ksaexpats.com/

  • Text Editor in Java with Source Code

    Text Editor in Java with Source Code

    Today, I am going to make a Text Editor program using our Java. Yeah, Like notepad. I want to add some basic functionalities like Opening a file, Saving a file and option to change the font size. It will only take less than 100 lines of code to do this (Excluding User Interface).
    I started with the toolbar javax.swing.JToolBar and added 4 buttons. Button with simple label logo and text for open,save and font size changing. The display area is simply a JTextArea with monotype font.

    Opening a Text File

    It is pretty straightforward to use JFileChooser to select a file. When I started thinking about opening a file, I wanted a File Chooser that filter and display only text files.Thanks to FileNameExtensionFilter from javax.swing.filechooser.FileNameExtensionFilter. I am able to display only text files on the JFileChooser using the code
    FileNameExtensionFilter filter = new FileNameExtensionFilter("TEXT FILES", "txt", "text");
    fileOpener.setFileFilter(filter);
    
    When the user selects a file and click open, The Scanner from java.util.Scanner is used to read the file.
    Scanner scn = new Scanner(file);  
    String buffer = "";  
    while (scn.hasNext()) {  
       buffer += scn.nextLine() + "\n";  
    }  
    display.setText(buffer);  
    
    The “file” is nothing but the file taken from the JFileChooser and the while loop will continue until the end of file. “display” is the name of JTextArea, our display.

    Saving a Text File

    A global file variable called “currentEditingFile” is maintained to know whether we are working on a new, unsaved data or on an opened file. If “currentEditingFile” is null we have a new uncreated file. So the saving method will look to “currentEditingFile” and if it is null a JFileChooser will be opened to select the location for the new file. After selecting the directory, file name is taken from JOptionPane input dialog.
    The file is then written onto the file Using PrintWriter from java.io.PrintWriter.

    Changing Font Size

    A global variable with default font size as 14 is maintained and increased or decreased depending upon the button pressed.
    display.setFont(new java.awt.Font("Monospaced", 0, ++fontSize));  //Increase font size
    display.setFont(new java.awt.Font("Monospaced", 0, --fontSize)); //Decrease font size
    

    Extra Works

    It is not acceptable to exit the program without any notice when the user clicks on the Close button. In order to add a save confirmation, i made an override on the Window Closing operating and added a confirmation message. It is done from the constructor itself
    this.addWindowListener(new WindowAdapter() {  
       @Override  
       public void windowClosing(WindowEvent e) {  
    	 super.windowClosing(e); //To change body of generated methods, choose Tools | Templates.  
    	 int ans = JOptionPane.showConfirmDialog(rootPane, "Save Changes ?", "Confirm", JOptionPane.YES_NO_OPTION, JOptionPane.QUESTION_MESSAGE);  
    	 if (ans == JOptionPane.YES_OPTION) {  
    	   //Write Changes 
    	   saveChanges();  
    	 }  
       }  
    });
    

    So that’s it. Download the program / source code from below buttons. If this was helpful please like me on facebook and keep visiting for more cool programs and sources.

    Recommended Read

    Download Source Code Download Application 

    Screenshots:-

    Detachable Tool Panel

    Font size control

    File selector window

    Save complete dialog

  • Find Perfect Domain Name with Domain Suggestion Tools

    Find Perfect Domain Name with Domain Suggestion Tools

    We all like to have a short yet meaningful domain names for our website or blog. But searching for available domains on GoDaddy or Big Rock is very time consuming and frustrating. In my case, I wanted a simple domain name related to programming. I searched and searched. Finally bought www.genuinecoder.comfrom GoDaddy. The truth is, I named this blog as Genuine Coder after purchasing the domain name.

    So that’s not your case, right? Well, there are a number of ways to find out available domain names. Let’s see how we can find a perfect domain name for you.

    Lean Domain Search

    Lean domain search asks to enter a word that you want your domain name to include. I have used “programming” and got 3,875 available domains. Lean domain search provides options to sort result according to popularity, length or alphabetical order. Moreover, it searches on twitter to find out whether “@yourdomain” is available on twitter.
    Lean domain search for Domain Suggestion
    • When sorted based on popularity, I got “ProgrammingMarket.com” as the first result
    • When sorted according to length of the domain, I got “ExProgramming.com”.
    • Sorting based on alphabetical order gave me “AbacusProgramming.com”
    Lean domain search also provides Search Term Filter that helps to filter the result based on domain names starting with search term or ending with search term.

    Domains Bot

    Domains bot work like Lean domain search. Once you enter a keyword, you will get list of available domains. You can choose whether you want particular TLD (Top Level Domain) like .com, .org etc. It is also possible to choose the words from English, Deutsch, Español, Italiano, Français and Dutch.
    Domains Bot for Domain Suggestion

    NameMesh

    Name Mesh is also a good choice. Simply enter in your keywords and results will be sorted into eight categories of results, including Common, New, Short, Extra, Similar, SEO, Fun and Mix. You can refine your result by limiting the maximum characters or showing only ones that available with particular registrar like GoDaddy or BlueHost.
    Name mesh for Domain Suggestion

    Domainr

    Domainr is a simple tool to find available domains. It has less options compared to above ones. When you search for a specific keyword in domainr, you will get a list of .com, .org, .co.in etc variations. Unlike above tools, it does not provide any added keywords as prefix and suffix. 
    I searched for eye and got eye.com, eye.net etc. as taken and eye.org for sale.
    Domainr for Domain Suggestion

    Conclusion

    It is better to do a thorough research before buying a domain. Because After setting one domain for your website/blog, it is hard to change since all the search engine entries and back-links will be lost. Moreover, you will loose your precious Alexa ranking too.
    All of these tools are very helpful. Yet, I prefer LeanDomainSearch and NameMesh since they have a lot of search refining options. 
  • Emulating Fingerprint in Android Emulator

    Emulating Fingerprint in Android Emulator

    Android Emulators are simply the best way to test our application during development or when we want to use apps on PC. Currently, fingerprint smartphones are not that common, but surely, it will become one of the basic features like Bluetooth or Camera. So it is necessary to start making maximum use of the fingerprint scanner.

    Android Fingerprint Prompt

    When i started developing applications with a fingerprint scanner, I had to find a way to emulate the scanner in my emulator. Thanks to Android Developer website.
    Before explaining how to Emulate a fingerprint scanner, you have to make sure that the following requirements are satisfied in your system.
    • Currently, the Fingerprint API is only supported from Marshmallow. Make sure your emulator is running on Android M (API 23) or better.
    • Android SDK Tools Revision 24.3 or better.
    Watch my video on How to use fingerprint for emulator

    Steps for adding Fingerprint in Android Emulator

    • Activate Screen lock from Settings -> Security. Then Go to Fingerprint option to add new fingerprint

    • When prompt to place your finger on the scanner, emulate the fingerprint using ADB command.

    Android Fingerprint Authentication

    adb -e emu finger touch <finger_id>
    #Example
    adb -e emu finger touch 1155aa1155
    
    • You should see fingerprint detected message. That’s it. Done.
     
    • Whenever an application prompts for fingerprint, just use the previously used ADB command with the given finger_id to authenticate.
  • Making Calculator in JavaFX (with Source Code)

    Making Calculator in JavaFX (with Source Code)

    JavaFX is a wonderful improvement to Java programming language. It includes a wide number of new user interface controls and the ability to add cascade style sheets (CSS), Animations etc. Today, Let’s see how we can build a beautiful calculator in JavaFX with CSS styling. This tutorial is done using NetBeans IDE and JavaFX Scene Builder 2.0. Watch The Complete Tutorial Video below.

    Part 1 : User Interface Design and Event Handling

    Part 2 : Adding CSS

    Get This Project

    1. Get Source Code from GitHub
    2. Download Compiled JAR
  • Java File Explorer program with Source Code

    Java File Explorer program with Source Code

    Let’s develop a basic file explorer using java. Java’s FILE class from java.io package provides simple way to represent both files and directories. That means, the same class can represent both files and directories.
    This program starts by creating a new file in the root. For example we can start at C drive in windows or root(/) in Linux.


    File f = new File(“C:\”);  


    The list of available files and folders present in the given directory can be accessed using the function listFiles(). It returns a list of files pointing to the contents inside the directory. Using a for loop buttons are created dynamically for each of these files and added to the container panel.
    Handling Files
     
    The button can be either file or folder. Using isFile() function in the FILE class, it is possible to determine whether a file is a file or directory. If it is a file, we then have to open it, if possible.
    Java provides a powerful handle to the operating system using ‘Desktop’ class from java.awt package. Using Desktop we can open a file using the default program associated for it.
    Desktop.getDesktop().open(FileName); 
    Open() throws an IOException and should be caught properly.
    Handling Directories
    When we encounter a directory, which is the false case for isFile(), we have to display the contents in that directory. What we have to do here is a simple recursive call to the display function using this path after removing the all currently present components in the container.
    Container.removeAll() should do the trick.
    After adding the new buttons, it is necessary to refresh the panel. Remember that the newly added components will not be visible until you refresh the panel using revalidate() and repaint() functions present in the Panel class.
    container.revalidate();  
     container.repaint(); 
    Adding a back button
    It is a basic requirement for File explorers to add back buttons. In order to do so, we have to remember the history of directories. A stack is used for this purpose. Whenever a directory is accessed, its parent is added to the stack. When the back button is pressed, the top of the stack is popped and that directory is displayed.
    Go to directory
    Again, the same display function LoadBase() is utilized here. LoadBase taked the full pathname of directory and when the user gives the directory path directly, all that we have to do is to pass the given text to LoadBase(). The path may be invalid and it is displayed using message dialog. isExist() function in the file class helps to check whether a file/directory exists.

     
    Download Project  

    Main Window screenshot for Java File Explorer
    Loaded C Drive
    D drive listed using Java File Explorer
    Using Go to to load D drive
  • Directory / Folder Indexing Program Using Java

    Directory / Folder Indexing Program Using Java

    I thought it will be cool if I can make a program that scans some pen drive or hard disk connected to my PC in order find out how many images,videos or documents are there. In simple terms, a directory or folder/file indexing program. Thanks to java again.
    Java Directory / Folder Indexer
    Directory Indexer Main Window
    Directory indexer uses the FILE class from java.io package. An object of FILE can store both files and directories. The parent or Root directory, from where we start indexing is read from the user using normal JTextField. Then a function called processDirectory() is called with argument as the given input text.
    The function, processDirectory() then create a new File with argument as given path. Then the list of files and directories present inside the directory are taken as a file array using listFiles() method from File class. If you are interested in finding more about file listing, read How tocreate a file explorer in java.
     File[] listFiles = fl.listFiles();  
    After getting the list of contents in the given directory, a for loop is applied which will go through all the available contents (objects of File class). As we said earlier, it can be either a file or a directory. If it is a file, then we check its extension by splitting the name string using “.” Symbol. The fun thing about extension is, a file can contain more than 1 dotes. For example, I want to name my file as “genuine.coder.image.jpg”. It is perfectly alright to use this filename and if we go for splitting and taking the string after first dot, we will get “.coder” which is definitely not what we are expecting. So the solution is to find the string after last dot and it is achieved using the code
    String[] extension = listFile.getName().split("[.]");  
     String ex = extension[extension.length - 1]; 
    So now we have the extension. All that we have to do is to check the string against the required extension (jpg,png,pdf etc) and increment the counter.
     if (ex.equalsIgnoreCase("jpg")) {  
        jpg.setText(Integer.parseInt(jpg.getText()) + 1 + "");  
     }  
    I found this way of incrementing the counter as a simple one (not efficient at all) since I don’t have to maintain some arrays for each separate extensions.
    If the file object which is being processed is not a file, then it may be a directory. If it is, then we have to get inside of that and index them also. A simple recursive call to the function will do the trick.
     

    Java Directory / Folder Indexing Completed
    Indexing Completed Message
     if (listFile.isDirectory()) {  
          processDirectory(listFile.getAbsolutePath()); //Recursive call to processDirectoy  
     }  
    I have used a thread to call the processDirectory() function. If I don’t, the updating on the UI (incrementing the counter) will be lagging. Using just one new thread, it is possible to achieve better refreshing and processing rates. For this purpose, a new class named directoryProcessor is created and implemented as Runnable which is then passed as a runnable object for new Thread object. The processDirectory is called from inside the run() method of directoryProcessor.
    Class directoryProcessor
    class directoryProcessor implements Runnable {  
         @Override  
         public void run() {  
           processDirectory(input.getText());  
           sts.setText("Completed");  
           JOptionPane.showMessageDialog(rootPane, "Indexing Completed", "Done", JOptionPane.INFORMATION_MESSAGE);  
         }  
       }  
    Function processDirectory()
     
    public void processDirectory(String dir) {  
         File fl = new File(dir);  
         sts.setText("Processing " + dir);  
         File[] listFiles = fl.listFiles();  
         for (File listFile : listFiles) {  
           if (listFile.isFile()) {  
             String[] extension = listFile.getName().split("[.]");  
             String ex = (extension[extension.length - 1]);  
             if (ex.equalsIgnoreCase("jpg")) {  
               jpg.setText(Integer.parseInt(jpg.getText()) + 1 + "");  
             } else if (ex.equalsIgnoreCase("png")) {  
               png.setText(Integer.parseInt(png.getText()) + 1 + "");  
             } else if (ex.equalsIgnoreCase("gif")) {  
               gif.setText(Integer.parseInt(gif.getText()) + 1 + "");  
             } else if (ex.equalsIgnoreCase("ppt")) {  
               ppt.setText(Integer.parseInt(ppt.getText()) + 1 + "");  
             } else if (ex.equalsIgnoreCase("doc")) {  
               doc.setText(Integer.parseInt(doc.getText()) + 1 + "");  
             } else if (ex.equalsIgnoreCase("pdf")) {  
               pdf.setText(Integer.parseInt(pdf.getText()) + 1 + "");  
             } else if (ex.equalsIgnoreCase("mp4")) {  
               mp4.setText(Integer.parseInt(mp4.getText()) + 1 + "");  
             } else if (ex.equalsIgnoreCase("flv")) {  
               flv.setText(Integer.parseInt(flv.getText()) + 1 + "");  
             } else if (ex.equalsIgnoreCase("avi")) {  
               avi.setText(Integer.parseInt(avi.getText()) + 1 + "");  
             } else if (ex.equalsIgnoreCase("exe")) {  
               exe.setText(Integer.parseInt(exe.getText()) + 1 + "");  
             } else if (ex.equalsIgnoreCase("sh")) {  
               sh.setText(Integer.parseInt(sh.getText()) + 1 + "");  
             } else if (ex.equalsIgnoreCase("jar")) {  
               jar.setText(Integer.parseInt(jar.getText()) + 1 + "");  
             } else if (ex.equalsIgnoreCase("html")) {  
               html.setText(Integer.parseInt(html.getText()) + 1 + "");  
             } else if (ex.equalsIgnoreCase("php")) {  
               php.setText(Integer.parseInt(php.getText()) + 1 + "");  
             } else if (ex.equalsIgnoreCase("css")) {  
               css.setText(Integer.parseInt(css.getText()) + 1 + "");  
             } else if (ex.equalsIgnoreCase("js")) {  
               js.setText(Integer.parseInt(js.getText()) + 1 + "");  
             }  
           } else if (listFile.isDirectory()) {  
             try {  
               processDirectory(listFile.getAbsolutePath());  
             } catch (Exception e) {  
               System.err.println("Exception - " + e.getMessage());  
             }  
           }  
         }  
       } 
  • Install The Best Android Emulator For Ubuntu / Linux

    Install The Best Android Emulator For Ubuntu / Linux

    When we consider android emulators, the first option is Google’s default Android Emulator available in the android-sdk. But on a normal computer (in my 4GB Ram, Core i3 3rd Gen Processor Laptop) it takes around 5 minute to boot and performance is very laggy.  It becomes worse after starting android studio in case you are a developer. So I started looking for a faster yet stable android emulator for Linux. Genymotion

    Genymotion is the best android emulr Linux versator I have used so far. It is fast, simple and can be integrated into android studio without any additional configuration. If you are looking for an android emulator for android development or just want to run WhatsApp or something on your computer, Genymotion is the right choice. Genymotion is free for personal use and can be downloaded from their site after signup. If you want to use Genymotion for business use, try Desktop Edition For Business. Requirements

    Your system must have Virtualbox virtual machine present in order to use Genymotion. If you don’t have Virtualbox download the setup for your Linux version from Virtualbox linux installation page. Install it and restart system to continue.

    How To Install Genymotion In Ubuntu / Linux

    • Go to this Genymotion website and make a free account.
    • Login using your account and go to this download Page
      Download the right version of the setup for your computer (Select correct architecture 32bit or 64bit. If you are not sure, then download 32 bit )
    • The downloaded file will be of .bin extension. Linux wont allow to run a file that is downloaded from internet. You have to give the file executable privilege to run it. To do so, open terminalEither copy and paste your file to home or change terminal working directory by using ‘cd’ command.Type chmod +x file-name.bin where file-name is the name the downloaded file
    • Now, The installation will be in progress. Complete the installation
    • After the installation, You can start Genymotion from your launcher/Menu. If it is not present, then start the program manually from /home/you-user name/genymotion/genymotion (You may have to make this program executable using chmod)
    • Now you should see the following loading screen
    • Once loaded, You should see a login prompt. For login, use your previous username and password.
    • Now it is time to add a new phone to this emulator. You can do this by Clicking on the Add (+) button.
    • You should see a list of available emulators here. There you can find devices with almost all android versions you have heard of. Choose any one you want and click on Next. In the new window, you can set a name for your device. Click Next.
    • Wait for the downloading and installing complete. After you complete your virtual device installation, you will see the device in your Virtual Device List. Then you can add any number of emulators you want. In my case, I have added 3 of them.
    • Congratulations. You have successfully added an emulator. Now it is time to run it. Select the available emulator and click on start button. Then a message box will appear saying “Initializing virtual device”
    • It will take a little while to complete the firdt boot. Be patient :-). Here is a screenshot of my emulator  

    Keywords : Run android apps in linux, Run android apps in pc, Install Genymotion in linux ubuntu mint, Android emulator for linux, Fastest android emulator, Install apk in linux

  • Java Barcode Generator Program with Source Code

    Java Barcode Generator Program with Source Code

    We deal with barcodes every day. Compared to QR codes or Quick Response codes, it is simple to generate, read using a barcode reader. This is a java application that uses ‘barcode4j’ library to generate barcodes. Barcode Maker allows to create large number of barcodes between specified ranges. It basically reads the starting count, make the barcode and save to specified location. Then increments the number by the given increment interval, make and save. This is repeated until the end count given reached.

    Inputs

    Starting Count
    From which number the barcode is to be generated. Type 0 to start from 0
    Ending Count
    Up to what number the barcode is to be generated. Say 100
    Increment by
    Next barcode to be generated is found using the formula Starting Count + Increment by
    No of zeros before
    Will help to adjust the barcode width for smaller number like 0 and 1. If you are generating barcodes from 0-1000 then starting barcodes will be very small in width. This can be fixed by adding no of zeros before the number. Say 2
    Save to
    Choose where you want to save the generated barcodes

    Download

    Screenshots

    Main Window of Barcode Make with Sample Input

    Barcode Creating Completed

    Progress monitor

    Created barcodes

    You might also be interested in:-

    Keywords : Java Barcode Creator Software with Source Code , Barcode Generator

  • How to Add Facebook Page Plugin to Your Website or Blog

    How to Add Facebook Page Plugin to Your Website or Blog

    Facebook is currently the best place to promote our websites. It is always a better idea to start a dedicated Facebook page for your blog or website. You will be astonished by the amount of traffic it can provide. Moreover, sharing links across social medias will help to build a sold set of backlinks, which are one of the important parameters for search engine rankings.
    As always, Let’s do this as steps.
    • Go to Facebook’s developer page by clicking here.
    • Copy and paste your Facebook page address. My page address is  facebook.com/thegenuinecoder. You can get this address by simply visiting the page and copy address from address bar.
      It is possible to set Width and Height of the widget by giving required values in the proper text fields. But you can leave it empty if you want to.

       
    • A live preview will be generated after you paste the URL. Now it is time to integrate this to website. Click on the ‘Get Code’ button.
    • Copy The Step 2 Code. Paste it on your website, just below the <body> tag. [If you are using blogger, get HTML code from Template->Edit HTML option. Then Press ‘Save Template’]
    • Now copy the code under Step 3 and place where you want this plugin to appear. [ In blogger, Add HTML/Java Script widget with this code ]. Save changes.
    • Refresh your page. You will see a beautiful widget of your page. If you can’t, then carefully read and repeat the above steps.
    Keywords : Add beautiful Facebook page plugin to your website.
  • Install NetBeans with Oracle JDK in Ubuntu / Mint (Easy Way)

    Install NetBeans with Oracle JDK in Ubuntu / Mint (Easy Way)

    Programmers love to code in Linux. For me whether it is Android Studio or NetBeans, I used to get 2-3 times better speed in my Mint than in Windows. However, installing JDK offline in Linux is a tedious task. But NetBeans provides an easier way to do this. Let’s see how we can install Netbeans with Oracle JDK in linux.

    Instead of installing the JDK, NetBeans only require an extracted JDK in the home directory. So let’s do it

      • Download NetBeans executable for Linux (.sh File) and Oracle JDK(Download file like jdk-8uxx-linux-x64.tar.gz for x64 platform)
      • Copy These downloaded files to Home Directory
      • Extract The JDK in the Home folder itself
      • Give the netbeans executable privilage using this command on terminal. Replace xx with your version.chmod +x netbeans-xxx.sh
      • Now you can run the NetBeans setup using
        ./netbeans-xxx.sh
    • The NetBeans setup will automatically detect the JDK from the HOME directory. You can proceed with the installer and finish it.
    • Yeah ! You done it. Open NetBeans from your Launcher.

    Keywords : How to install netbeans with jdk, Simple way to install netbeans in ubuntu or mint, oracle jdk install

  • How to set WhatsApp Profile Pic as Contact Picture

    How to set WhatsApp Profile Pic as Contact Picture

    It is always nice to see the picture of our loved ones when they call us. But downloading their photos and then setting them as contact photo is a tedious job. What if we can simply set their WhatsApp photo as contact picture. Yeah! That seems to be a pretty good idea.

    But… How?

    Well, there is an App for that in google play store. Let me explain the process as steps.

    • ·    Open it. You can see all your contacts in the app. The left side photo represents your current contact photo and right side one represents the photo available in WhatsApp. Remember, the right side photo will not be available until you save the person’s picture in WhatsApp manually.
       
      Main Screen, Left side photo represents current contact photo and right side is the available whatsapp photo.
    • ·    Select the contact which you want to update photo.
    • ·    The application will ask for a confirmation to launch WhatsApp. Click OK.
       
      Confirmation to launch whatsapp
    • ·    This will launch WhatsApp profile of the person. Click on his/her profile pic and Save it (Share -> Save to gallery).
    • ·    When you come back to the Contact Photo Sync App, you will be given another prompt to confirm the photo update.
     
    Confirmation to set whatsapp image as profile pic
    • ·    Click YES, or YES, Not Show Again.
    • ·    And yes! You are done.
       
      All Done
      Search : Set WhatsApp profile pic as contact picture