Tag: Tutorial

  • JavaFX Communication Between Controllers

    JavaFX Communication Between Controllers

    When you begin with JavaFX, one problem you might come up with is the communication between different controllers to communicate between scenes. In this article, we will see how to properly communicate between two different controllers in JavaFX.

    JavaFX Controller Communication Method

    The solution here is to get the controller from FXMLLoader. We use JavaFX FXMLLoader for inflating fxml and loading new views. This loader has a method called getController(). getController method will return an instance of the controller corresponding to the view we are going to load.

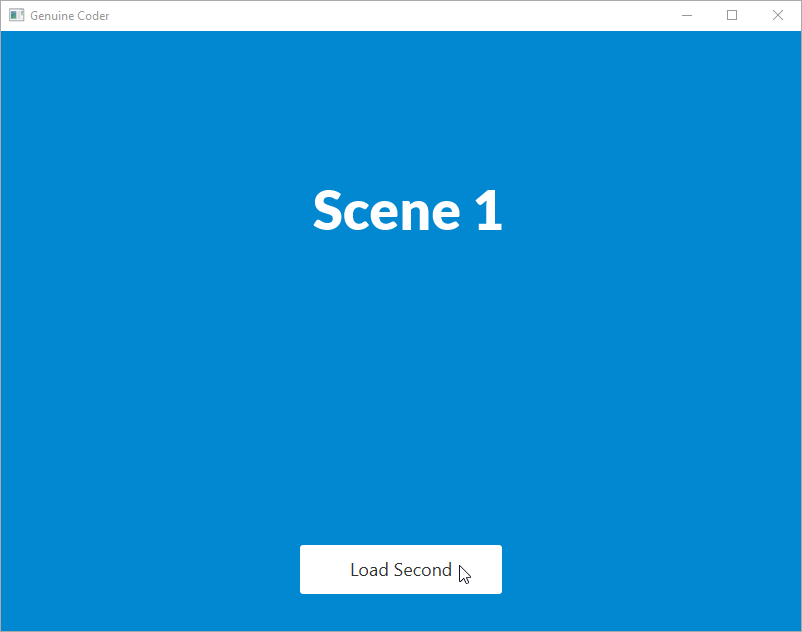
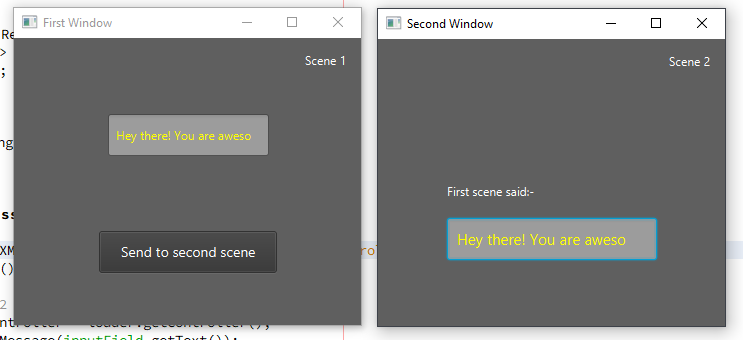
    In this example, we take input to a text field from the user. When a button is clicked, new window will be opened and we pass the typed text to new window.

    First Scene Controller

    When the button actionBtn is clicked, a new window will be called which is the second scene window. We take the input from inputField textfield and pass it with transfer data.

    public class Scene1Controller implements Initializable {
    
        @FXML
        private TextField inputField;
        @FXML
        private Button actionBtn;
    
        @Override
        public void initialize(URL url, ResourceBundle rb) {
            //When button clicked, load window and pass data
            actionBtn.setOnAction(event -> {
                loadSceneAndSendMessage();
            });
        }
    
        private void loadSceneAndSendMessage() {
            try {
                //Load second scene
                FXMLLoader loader = new FXMLLoader(getClass().getResource("/javafxcontrollercommunication/scene2/scene2.fxml"));
                Parent root = loader.load();
    
                //Get controller of scene2
                Scene2Controller scene2Controller = loader.getController();
                //Pass whatever data you want. You can have multiple method calls here
                scene2Controller.transferMessage(inputField.getText());
    
                //Show scene 2 in new window
                Stage stage = new Stage();
                stage.setScene(new Scene(root));
                stage.setTitle("Second Window");
                stage.show();
            } catch (IOException ex) {
                System.err.println(ex);
            }
        }
    }
    

    Second Scene Controller

    This controller is elementary. You just have to write a method that accepts the string. Once the string is received, we set that in the display TextField.

    public class Scene2Controller {
        @FXML
        private TextField display;
    
        //Receive message from scene 1
        public void transferMessage(String message) {
            //Display the message
            display.setText(message);
        }
    }
    

    Watch another example on YouTube


    You may also find following interesting:-

    View in Github
    [JavaFX communicate between scenes, JavaFX window communication. JavaFX share data between scenes]

  • JavaFX Splash Screen

    JavaFX Splash Screen

    Splash screens are awesome. They allows to engage users when the application load in the background as a loading screen. In this article, we will talk about implementing JavaFX Splash Screen / Loading Screen with animation. For the splash screen, we will provide a fade-in and fade-out transition.

    Splash Screen with Fade Animation

    In this example, when the program starts, the splash screen will fade in. After some time, the flash screen will fade out.

    The algorithm is as follows

    • Load Preloader with a fade-in effect using FadeTransition
    • Remove Preloader with a fade-out effect using Fade transition.
    • On the end of fade-out load the actual content to the frame.

    Watch the implementation:-

    Let’s have a look at the code. The code is properly commented.

    private void loadSplashScreen() {
    	try {
    		//Load splash screen view FXML
    		StackPane pane = FXMLLoader.load(getClass().getResource(("myAwesomeSplashDesign.fxml")));
    		//Add it to root container (Can be StackPane, AnchorPane etc)
    		root.getChildren().setAll(pane);
    
    		//Load splash screen with fade in effect
    		FadeTransition fadeIn = new FadeTransition(Duration.seconds(3), pane);
    		fadeIn.setFromValue(0);
    		fadeIn.setToValue(1);
    		fadeIn.setCycleCount(1);
    
    		//Finish splash with fade out effect
    		FadeTransition fadeOut = new FadeTransition(Duration.seconds(3), pane);
    		fadeOut.setFromValue(1);
    		fadeOut.setToValue(0);
    		fadeOut.setCycleCount(1);
    
    		fadeIn.play();
    
    		//After fade in, start fade out
    		fadeIn.setOnFinished((e) -> {
    			fadeOut.play();
    		});
    
    		//After fade out, load actual content
    		fadeOut.setOnFinished((e) -> {
    			try {
    				AnchorPane parentContent = FXMLLoader.load(getClass().getResource(("/main.fxml")));
    				root.getChildren().setAll(parentContent);
    			} catch (IOException ex) {
    				Logger.getLogger(MainController.class.getName()).log(Level.SEVERE, null, ex);
    			}
    		});
    	} catch (IOException ex) {
    		Logger.getLogger(MainController.class.getName()).log(Level.SEVERE, null, ex);
    	}
    }
    

    How to show splash screen until loading gets completed

    Sometimes you may want to do some actual work like loading a database or importing something. In this case, we will have to do it in the background while splash screen is shown.

    You can do the heavy lifting tasks on the setOnFinished() method of fade-in transition.

    fadeIn.setOnFinished((e) -> {
        //Do the loading tasks
        DatabaseImporter.import();
        SomeComplexTask.start();
        //...
        //After the background tasks are done, load the fadeout
        fadeOut.play();
    });
    
    Problem with this approach

    The above code works fine when the background tasks are not that much (when the tasks complete within couple of seconds max). But if it is a long task, then the JavaFX UI Thread will hang. In this case, you might have to use a separate thread for processing the background tasks.

    The reliable solution

    You can make use of JavaFX Tasks or JavaFX Services. Then using a task complete listener, you can initiate fade out transition.

    fadeIn.setOnFinished((e) -> {
        //Start the Worker Task
        BackgroundWorkerTask task = new BackgroundWorkerTask();
        task.start();
        //After the completion of the task, start fadeOut animation
        task.setOnSucceeded(successEvent -> {
          fadeOut.play();
        });
    });
    

    So, that’s how you implement a JavaFX Splash Screen.

    See example on GitHub

    JavaFX Splash Screen without Borders

    In this video tutorial, you can see how to make a splash screen in a separate window without window borders. Here, splash screen uses a separate stage.

  • JavaFX 3D Tutorial #1 – Introduction to 3D development

    JavaFX 3D Tutorial #1 – Introduction to 3D development

    This is the the first chapter of JavaFX 3D Tutorial.

    JavaFX provides an easy to use 3D API. It provides GPU based acceleration and hence can make use of latest powerful hardware. In this tutorial series, we will learn about using JavaFX 3D in our everyday applications.

    Course Introduction

    JavaFX 3D Coordinates

    When we dive in to 3D application development, the most important part is the coordinate system. You have to understand how the x, y and z-axis changes in the screen. The following image describes the coordinate system in JavaFX 3D.

    • X increases when you go from left to right
    • Y increases when you go from top to bottom
    • Z increases when the objects goes away from you.

    JavaFX 3D Camera System

    Camera defines how we see an object. When you want to transform an object, you can either work on the object or the camera.

    JavaFX rotation concept. Taken from tutorial video

    So, let’s say you want to rotate an object. You can do this either by rotating the object or rotating the camera around the object itself.

    JavaFX provides two cameras. Perspective camera and Parallel Camera. We’ll talk more about camera in Chapter 2.

    Create a sphere in JavaFX 3D

    JavaFX provides set of predefined 3D objects. You can create your own custom 3D shapes if you want. But to start with, these predefined shapes are the best.

    import javafx.application.Application;
    import javafx.scene.Camera;
    import javafx.scene.Group;
    import javafx.scene.PerspectiveCamera;
    import javafx.scene.Scene;
    import javafx.scene.input.KeyEvent;
    import javafx.scene.paint.Color;
    import javafx.scene.shape.Sphere;
    import javafx.stage.Stage;
    
    /**
     * @author afsal villan
     * @version 1.0
     *
     * https://genuinecoder.com
     */
    public class Sphere3D extends Application {
    
      private static final int WIDTH = 1400;
      private static final int HEIGHT = 800;
    
      @Override
      public void start(Stage primaryStage) {
        Sphere sphere = new Sphere(50);
    
        Group group = new Group();
        group.getChildren().add(sphere);
    
        Camera camera = new PerspectiveCamera();
        Scene scene = new Scene(group, WIDTH, HEIGHT);
        scene.setFill(Color.SILVER);
        scene.setCamera(camera);
    
        sphere.translateXProperty().set(WIDTH / 2);
        sphere.translateYProperty().set(HEIGHT / 2);
    
        primaryStage.addEventHandler(KeyEvent.KEY_PRESSED, event ->{
          switch (event.getCode()) {
            case W:
              sphere.translateZProperty().set(sphere.getTranslateZ() + 100);
              break;
            case S:
              sphere.translateZProperty().set(sphere.getTranslateZ() - 100);
              break;
          }
        });
    
        primaryStage.setTitle("Genuine Coder");
        primaryStage.setScene(scene);
        primaryStage.show();
      }
    
      public static void main(String[] args) {
        launch(args);
      }
    }
    

    Let’s break down the code.

    1. Create a new sphere.
      The predefined Sphere shape is available in javafx.scene.shape.Shape3D package. You can simply create an instance. The parameter specifies the radius.

      Sphere sphere = new Sphere(50);
      
    2. Create a group as container
      Group group = new Group(); 
      group.getChildren().add(sphere);
      
    3. Prepare camera
      JavaFX provides two camera systems. Parallel camera and perspective camera. Perspective camera allows to view objects from a specified point. You can simply create an instance and attach it to the scene.

      //Create a new perspective camera
      Camera camera = new PerspectiveCamera(); 
      //Attach camera to scene
      scene.setCamera(camera);
      
    4. Move sphere to center of the screen
      We can move the 3D object around using translateProperty. Here the object is moved to center of the screen.

      sphere.translateXProperty().set(WIDTH / 2); 
      sphere.translateYProperty().set(HEIGHT / 2);
      
    5. Add keyboard listener to control Z-axis / Zoom.
      The z-axis can be controlled using translateZProperty. Currently, using KeyEvent.KEY_PRESSED event handler, we can listener for keyboard input. When ‘W’ is pressed, the object goes away from the user as the z gets increased and when ‘S’ is pressed, vice versa.

          primaryStage.addEventHandler(KeyEvent.KEY_PRESSED, event -> {
            switch (event.getCode()) {
              case W:
                sphere.translateZProperty().set(sphere.getTranslateZ() + 100);
                break;
              case S:
                sphere.translateZProperty().set(sphere.getTranslateZ() - 100);
                break;
            }
          });
      
    6. Attach scene to stage and display.

    Chapter 1 Tutorial Video

    Visit JavaFX 3D Course Index Page

  • JavaFX Scene Switch Animation

    JavaFX Scene Switch Animation

    We all love JavaFX for its modern look and easy to use user interface APIs. In this article we will discuss about JavaFX Scene Switch (Change) animation. I have implemented two types of scene change animation. Fading Scenes and Sliding Scenes.

    By default, JavaFX animation api does not provide a direct option animate a scene change. But we can use the following way.

    1. Load primary stage with a scene. Enclose this scene in a root container. This container can be of your preference. StackPane, Group etc can be used.
    2. When changing scenes, remove everything from this root container.
    3. Load the scene to be loaded to a variable. Add it new scene to the root container with animation.

    Sliding Scene Transition

    In this animation, we will get a nice sliding effect for the scenes. You can see the preview in the following GIF.

    JavaFX Scene Sliding Animation
    JavaFX Scene Sliding Animation

    The idea here is to load the new scene beyond the visibility of the screen. For example, if the window height is 500px, then load the new scene at 500px. Then using KeyFrame animation, take the scene translateY to 0. This creates a slide in effect from bottom. Using translateX, we can implement slide in effect from sides.

    Let’s see this in code. Following file is the first scene’s controller. When loadSecondScene() is called, second scene will be added.

    /**
     * Removed Imports for code simplicity
     * FILE - Scene 1 Controller. On button Click, Scene 2 will be loaded  
     * @author Genuine Coder
     */
    public class FirstSceneController implements Initializable {
        @FXML
        private AnchorPane anchorRoot;
        @FXML
        private StackPane parentContainer;
    
        @FXML
        private void loadSecondScene(ActionEvent event) throws IOException {
            Parent root = FXMLLoader.load(getClass().getResource("myscene2.fxml"));
            Scene scene = anchorRoot.getScene();
            //Set Y of second scene to Height of window
            root.translateYProperty().set(scene.getHeight());
            //Add second scene. Now both first and second scene is present
            parentContainer.getChildren().add(root);
    
            //Create new TimeLine animation
            Timeline timeline = new Timeline();
            //Animate Y property
            KeyValue kv = new KeyValue(root.translateYProperty(), 0, Interpolator.EASE_IN);
            KeyFrame kf = new KeyFrame(Duration.seconds(1), kv);
            timeline.getKeyFrames().add(kf);
            //After completing animation, remove first scene
            timeline.setOnFinished(t -> {
                parentContainer.getChildren().remove(anchorRoot);
            });
            timeline.play();
        }
    }
    

    Watch the Slide Transition in action from Genuine Coder Channel

    Fading Scene Transition

    Fading screen transition can also be implemented with a similar concept as of Sliding Screen transition.  The idea is, we apply a fade out transition for the first scene. After completion of fade out transition of first scene, we add second scene. The second scene will be added with zero opacity. Then using fade in transition we make the second scene visible.

    You can see the program in action in the following Genuine Coder Tutorial video.

  • How to Add Facebook Page Plugin to Your Website or Blog

    How to Add Facebook Page Plugin to Your Website or Blog

    Facebook is currently the best place to promote our websites. It is always a better idea to start a dedicated Facebook page for your blog or website. You will be astonished by the amount of traffic it can provide. Moreover, sharing links across social medias will help to build a sold set of backlinks, which are one of the important parameters for search engine rankings.
    As always, Let’s do this as steps.
    • Go to Facebook’s developer page by clicking here.
    • Copy and paste your Facebook page address. My page address is  facebook.com/thegenuinecoder. You can get this address by simply visiting the page and copy address from address bar.
      It is possible to set Width and Height of the widget by giving required values in the proper text fields. But you can leave it empty if you want to.

       
    • A live preview will be generated after you paste the URL. Now it is time to integrate this to website. Click on the ‘Get Code’ button.
    • Copy The Step 2 Code. Paste it on your website, just below the <body> tag. [If you are using blogger, get HTML code from Template->Edit HTML option. Then Press ‘Save Template’]
    • Now copy the code under Step 3 and place where you want this plugin to appear. [ In blogger, Add HTML/Java Script widget with this code ]. Save changes.
    • Refresh your page. You will see a beautiful widget of your page. If you can’t, then carefully read and repeat the above steps.
    Keywords : Add beautiful Facebook page plugin to your website.
  • Temperature Monitor Prorgam using JavaFX

    Temperature Monitor Prorgam using JavaFX

    Today i am going to show you how to create a system temperature monitor program in JavaFX. This program use Line Chart from JavaFX library. In order to get the temperature readings, i have given a connection to the system terminal so that i can execute terminal commands within the Java program itself.
    Process proc = Runtime.getRuntime().exec("sensors");
    BufferedReader reader = new BufferedReader(new InputStreamReader(proc.getInputStream()));
    
    This code will create a new process and will attach to the ‘sensors’ command. This program will work only on linux and the number of temperature readings will change from system to system. Using the process’s input stream we can read the output of the command passed through a Buffered Reader.
    After the establishment of connection with sensors, I have added an infinite loop with 1000ms sleep so that the temperature information will be updated each second. The returned data from process is taken and matched with a pattern [+]…. which will help to select the required temperature information alone. For this purpose, i have made use of Matcher and Pattern class in standard Java Library.
    If you are not familiar with JavaFX line graphs, i recommend reading this article How to Add JavaFX Charts / Graphs Tutorial.
    The processed data is then associated with 4 streams of XYData.Series() data structure to represent 4 different lines on the graph. Extensive CSS styling is used in this program to illustrate the capability of CSS to improve the look and feel of program (if it did :-)). The animations that can be seen on the video is the primitive animation associated with JavaFX LineChart.


    Watch the development in Action. Subscribe for more programs and tutorials

  • C++ program to find the largest and second largest number present in an array

    C++ program to find the largest and second largest number present in an array

    C++ program to find the largest and second-largest numbers present in an array along with their location index on the array. This program first find the largest number by going through all the numbers in the array. It stores the index of the largest number on the variable pos1 and largest number is the largest variable. A second for loop is applied, which also check for the largest number. When it hits on the largest found by the first loop, it is bypassed using a continue statement and hence will get the second-largest number.

    #include <iostream>
    #include <conio.h>
    using namespace std;
    
    void main()
    {
    	int a[10], i, largest = 0, second_largest = 0, pos1, pos2;
    	int n;
    	cout << "Enter Number of elements :";
    	cin >> n;
    	for (i = 0; i < n; ++i)
    	{
    		cout << "n Enter " << (i + 1) << "th Element :";
    		cin >> a[i];
    	}
    	//Finding Largest
    	for (i = 0; i < 10; ++i)
    	{
    		if (a[i] > largest)
    		{
    			largest = a[i];
    			pos1 = i;
    		}
    	}
    	//finding second largset
    	for (i = 0; i < 10; ++i)
    	{
    		if (a[i] > second_largest)
    		{
    			if (a[i] == largest)
    				continue;	//Ignoring largest in order to get second largest
    			second_largest = a[i];
    			pos2 = i;
    		}
    	}
    	cout << "nn Largest Number :" << largest << " at position " << (pos1 + 1);
    	cout << "nn Second Largest Number :" << second_largest << " at position " << (pos2 + 1);
    
    	getch();
    	return;
    }
    

    *Compiled using Visual Studio

    OutputOutput of program to find the largest and second largest number present in an array